Creating Test Data for MongoDB
Introduction: This example demonstrates an older method of using IRI RowGen to generate and populate large or complex collection prototypes for testing or system capacity using flat files. As you will read, RowGen would create the necessary test data and create a CSV file that would be loaded into MongoDB using the Mongo Import Utility.
2019 Update: IRI now also offers JSON and direct driver support to move data between MongoDB collections and SortCL-compatible IRI software products like RowGen or FieldShield. This means you can use RowGen to generate test JSON files for import into MongoDB (not unlike the method shown below in this article), or use FieldShield to mask data in Mongo tables into test targets.
Note that both FieldShield and RowGen are included in the IRI Voracity data management platform, which offers four ways to create test data.
Although MongoDB is a fine cross-platform, document-oriented NoSQL database, it has no convenient way to generate and populate large or complex collection prototypes that can be used to test queries or plan capacity. This article explains how to create test data MongoDB can use via IRI RowGen, specifying the parameters for a synthetic, but realistic, CSV file that MongoDB can import for functional and performance testing.
You must first consider the structure and content of the test data for your collection (MongoDB table) needs. See this article for typical planning considerations.
In the example, we know that our collection will be made up of customers who all have Usernames, First and Last Names, Email Addresses, and Credit Card Numbers.
To create our test data, we must first generate some set files. A set file is a list of one or more tab-delimited values that may already exist, or need to be generated manually or automatically from database columns through the ‘Generate New Set File’ wizard in IRI RowGen.
Generating Names
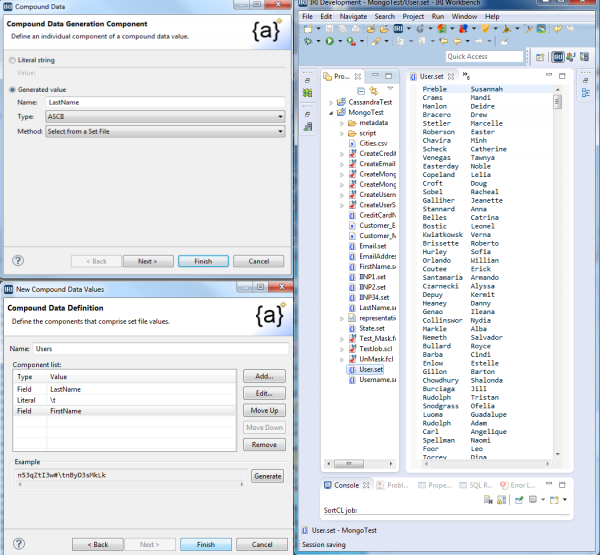
1) Create a compound data value (first and last names combined) job script named “CreateNamesSet.rcl” that RowGen can execute to produce a set file; call the output “User.set” because these names will also be used as the basis for our usernames.
2) Create three fields to be generated in Names.set: last name, tab separator, and first name. Name the first field “LastName” and choose the method that will select values from an IRI-provided set file called “names_last.set”. Add the literal value “\t” to add a tab separator, and then repeat the process used for LastName and FirstName values using names_first.set.
3) Run CreateNamesSet.rcl with RowGen, either on the command line or from the IRI Workbench GUI, to produce the tab-delimited User.set file of first and last names, which will be used in both the generation of usernames and in the final test file build that populates our prototype collection.
Generating Usernames
For Usernames, we will create a set file that utilizes the Users.set file generated above. Usernames for this example will combine last name, first initial, and a randomly generated number between 100 and 999.
1) Create a new RowGen job script with the Compound Data Wizard, call it “CreateUsernamesSet.rcl”, and name the output set file “Usernames.set”.
2) Build compound username values with three components named Part1, Part2, and Part3.
3) For Part1, choose the method that will select values from (browse to) the previously-generated User.set file, and specify ‘ALL’ for the selection type to maintain the association between users, usernames, and email addresses. Set the size to 5.
4) For Part2 repeat the process used for Part1, except for Selection type, select ‘Row’ and set Column Index to 2. Set the size to 1. This guarantees all the last names will be used in the generation, and that the first letter of the first name in the same row is appended to the user name.
5) For Part3, specify the generation of a numeric value between 100 and 999 to suffix a random integer with each username.
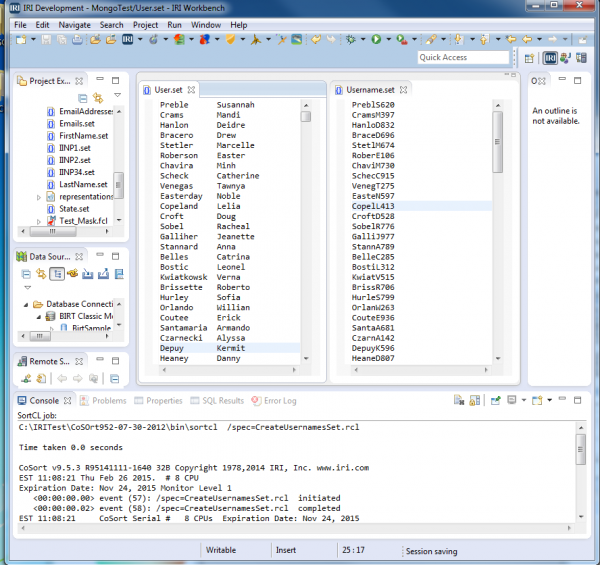
Upon execution of CreateUsernamesSet.rcl, we see that each username contains the first five letters of their last name, then their first initial, then a random 3-digit number:
Generating Emails
Next we will create an email set file that appends the username values with randomly-selected domain names. Because some email services are more popular than others, we will also create a weighting system to reflect a higher frequency of yahoo and gmail domains.
1) Run RowGen’s ‘New Custom Test Data’ job wizard to create a job called “CreateEmailsSet” that produces a set file called “Emails.set”.
2) Produce the username part of the email. In the Test Data Definition dialog, click New Field, and rename the first field Usernames. Double-click on it to launch the Generation Field dialog and “Define …” its Set file as Usernames.set. Set the size to 9 and click OK.
3) Produce the domain part of the email (which includes the @ symbol). In the Layout Fields dialog, click New Field and rename it to “address” and double-click on it. In the Generation Field dialog, specify a ” ,” with a position of 10 and a size of 20. In the Data Generation / Data Distribution section below, click “Define …” to name a new data distribution of items “WeightedEmails”.
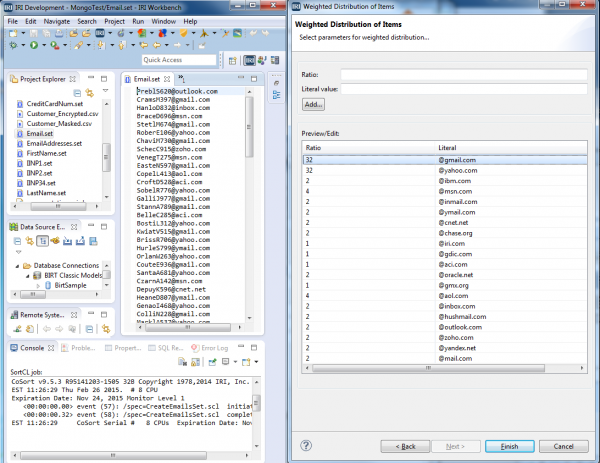
4) In the New Distribution Wizard, chose ‘Weighted Distribution of Items’ and enter these items into the ratio and literal text boxes respectively, then add each to the list.
(32 | @gmail.com), (32 | @yahoo.com), (2 | @ibm.com), (4 | @msn.com), (2 | @ymail.com), (2 | @inmail.com), (2 | @cnet.net), (2 | @chase.org), (1 | @iri.com), (1 | @gdic.com), (1 | @aci.com), (2 | @oracle.net), (1 | @gmx.org), (4 | @aol.com), (2 | @inbox.com), (2 | @hushmail.com), (2 | @outlook.com), (2 | @zoho.com), (2 | @yandex.net), (2 | @mail.com)
After you enter these values, click Next in the original wizard to move into the Data Targets dialog. Use “Add Data Target …” to specify the output file “Email.set”. This will also be used at collection-build time.
The email we set the highest weights for (gmail and yahoo) show up most frequently, with others showing up periodically.
Generating Credit Card Numbers
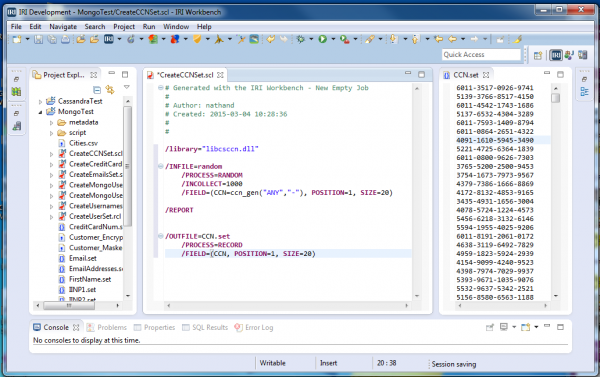
Lastly, we will create computationally valid card numbers in the format XXXX-XXXX-XXXX-XXXX. The first four digits reflect actual Issue Identifier Numbers (IIN) of various credit card companies, and the last digit verifies the cards’ authenticity.
To do this, create and run a new (empty) job. Call it “CreateCCNSet.rcl” (or .scl), and populate it with the script below to create “CCN.set”. The /INCOLLECT value in RowGen scripts determines the number of rows generated.
RowGen’s purpose-built CCN generation function, ccn_gen(“ANY, “-“) is called to populate this field. Note similar functions exist for US and Korean social security numbers, and the national IDs of Italy and The Netherlands.
Creating the Final Test File
With all set files built, it is time to use them in the test CSV file we’ll create and export to a MongoDB collection.
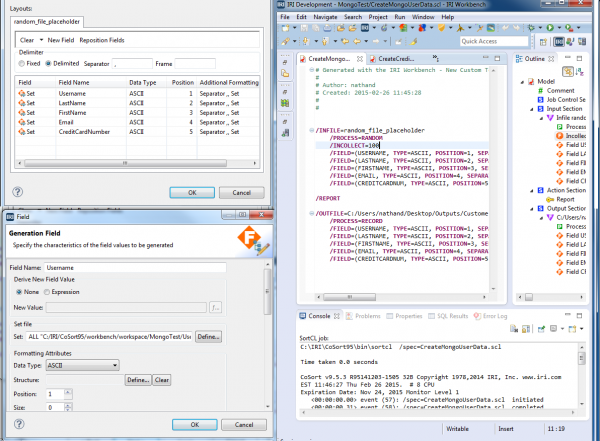
1) Run RowGen’s ‘New Custom Test Data’ job wizard to create a job called “CreateMongoUserData.rcl” that will generate the Customers.csv file, the file we will then export to MongoDB.
2) Click “Layout Fields …” to enter the Layout Fields Dialog. Click New Field and rename the first field to Usernames. Double-click on it to launch the Generation Field dialog and “Define …” its Set file as Usernames.set; then select ALL for its selection type.
3) Click New Field and rename the second field to LastNames. Double-click on it to launch the Generation Field dialog and “Define …” its Set file as Users.set; then select ALL for its selection type.
4) Click New Field and rename the third field to FirstNames. Double-click on it to launch the Generation Field dialog and “Define …” its Set file as Users.set; then select ROWS for its selection type and set the column index to 2.
5) Click New Field and rename the fourth field to Email. Double-click on it to launch the Generation Field dialog and “Define …” its Set file as Emails.set; then select ALL for its selection type.
6) Click New Field and rename the fifth field to CreditCardNumbers. Double-click on it to launch the Generation Field dialog and “Define …” its Set file as CCN.set; then select ALL for its selection type.
7) After you enter these values, click Next in the original wizard to move into the Data Targets dialog. Use “Add Data Target …” to specify the output file Customers.csv; then run the script in the Workbench or on the command line to generate that file:
rowgen /spec=CreateMongoUserData.rcl
Note that RowGen, in addition to producing this CSV file at runtime, could have also produced multiple, other file, database, formatted-report, named-pipe, procedural, and even real-time BIRT display, with fields from the generated test data, all at the same time.
Importing to MongoDB
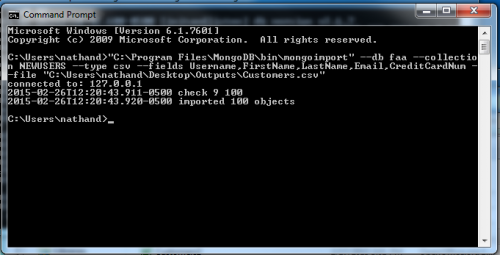
To import the CSV file into your Mongo Database, call the ‘mongoimport utility’ and run the following command:
--db <Database Name> --collection <Collection Name> --type csv --fields <fieldname1,fieldname2,...> --file <File path to the CSV file to import>
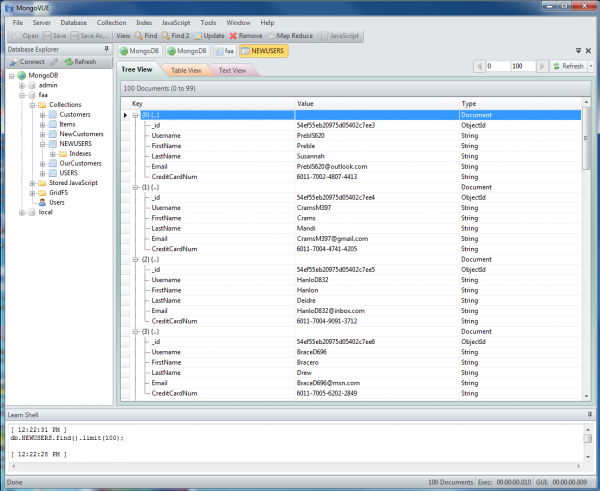
Here are the records in the test collection (shown with MongoVUE), which MongoDB will automatically index with generated ID values for each entry:
MongoDB assigns a unique ID value to each collection entry.
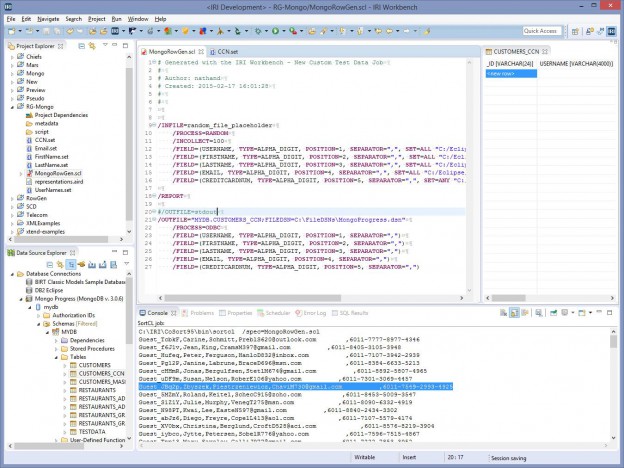
You can also load test data directly into the Mongo Database using Progress Software’s DataDirect ODBC driver for MongoDB. Before running the RowGen job in the Workbench, I had an empty collection called CUSTOMERS_CNN in MYDB to receive the data.
I ran the job first using stdout, to preview my test data in the console window:
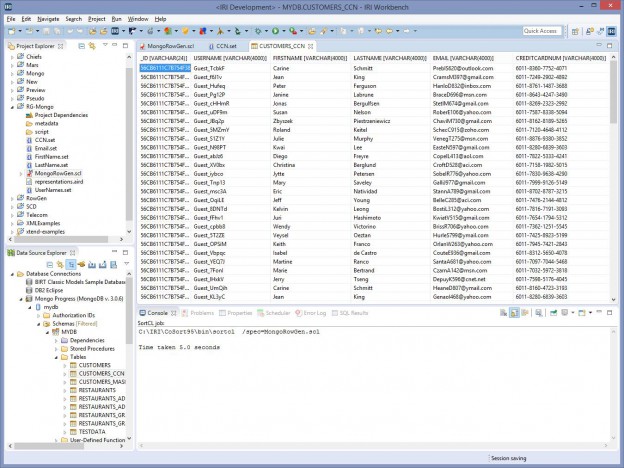
After executing the script in the Workbench, I can now see my data using the Data Source Explorer, and the DataDirect JDBC driver.
For more information on the generation options available, see the Test File Targets section at: http://www.iri.com/products/rowgen/technical-details.
