Creating & Executing SQL Statements in IRI Workbench
Among the many database-centric features in IRI Workbench is the ability to create, modify, and execute SQL statements manually or graphically. These “SQL scrap-booking” features are available through the free Data Tools Platform (DTP) plug-in for Eclipse, which also supports IRI job wizards for database:
- profiling, searching, classification, E-R diagramming, and integrity checking
- integration, including ETL, pivoting, slowly changing dimensions, and change data capture
- column masking, including format-preserving encryption, redaction, and pseudonymization
- subsetting, test data generation, and bulk loading
- migration, replication, and offline reorgs
To use the cross-platform(!) SQL and IRI facilities in Workbench, you must first make a JDBC connection1 to your database from the DTP’s Data Source Explorer view. Once you are connected, you will be able to see your tables, and work with them with Eclipse or IRI tooling. This article focuses only on the use of DTP features for creating and executing SQL statements.
There are two ways to create a SQL file:
- From within a project, click File on the menu bar -> New -> File. In the File Name field, type in the file name, making sure it has a .sql extension, then click Finish.
- In the Data Source Explorer, right-click on the connection name -> click Open SQL Scrapbook. This will have the name “SQL Scrapbook n”, where n is the number of the next scrapbook file in sequence if any previous files were not saved. Then you must select a project where the file will be saved, give the file a name, and click Finish.
For each method, a new file opens in the editor with an upper section for defining the Connection profile for the database you are working with. The Connection profile has three menus:
- Type lists the installed driver types
- Name lists the name of defined database connections
- Database lists the name for the database instance
Select the Name first, then the driver Type defined for the Name will automatically be selected. Once those are selected, the Status indicates if that profile is connected or active in IRI Workbench. To activate the connection, go to the Data Source Explorer, right-click on the connection name, and click Connect. The status will show Connected. Now select the instance from the Database dropdown menu.
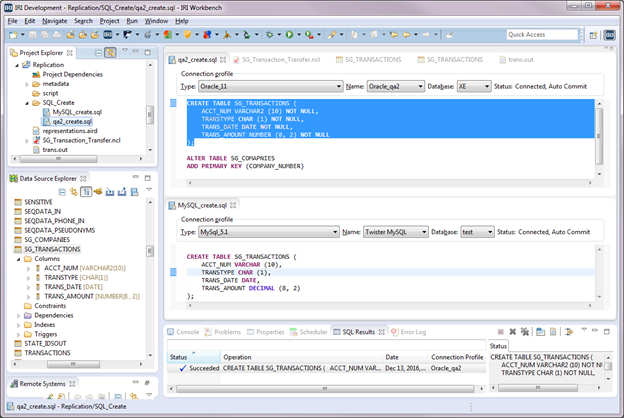
The IRI Workbench window below shows two SQL files at once: one with SQL statements for a MySQL database and the other for an Oracle database. You can have multiple unrelated SQL statements in a file, but you must make separate SQL files for different connections. When you are ready to execute the statements, highlight the desired statements -> right-click -> click Execute Selected Text. To execute the entire file, right-click -> click Execute All.
For example, if we highlight just the CREATE TABLE section in the file qa2_create.sql, we will create the table SG_TRANSACTIONS in our Oracle database. After execution, the SQL Results perspective has columns that show the Status (Succeeded or Failed), Operation (the SQL operation that was executed), Date of execution, and Connection Profile for the operation. In the Data Source Explorer, you can expand the connection until you see the newly created table and its columns.

Tables you have created and/or altered are immediately available for use as sources and targets in IRI job scripts, and if you use a wizard to create those jobs, you can create the metadata definitions within the wizard or select an existing metadata file.
IRI jobs connect to the tables via defined ODBC connections with /INFILE or /OUTFILE=table definition and /PROCESS=ODBC statements. For example, you might use a wizard to generate a script like this:
/INFILE="NIGHTLY.SG_TRANSACTIONS;DSN=Oracle_qa2;UID=nightly;PWD=N321ghtly;"
   /ALIAS=NIGHTLY_SG_TRANSACTIONS
   /PROCESS=ODBC
   /FIELD=(ACCT_NUM, TYPE=ASCII, POSITION=1, SEPARATOR="|", EXT_FIELD="ACCT_NUM")
   /FIELD=(TRANSTYPE, TYPE=ASCII, POSITION=2, SEPARATOR="|", EXT_FIELD="TRANSTYPE")
   /FIELD=(TRANS_DATE, TYPE=ISO_DATE, POSITION=3, SEPARATOR="|", EXT_FIELD="TRANS_DATE")
   /FIELD=(TRANS_AMOUNT, TYPE=NUMERIC, POSITION=4, SEPARATOR="|", EXT_FIELD="TRANS_AMOUNT")
/REPORT
/OUTFILE="SG_TRANSACTIONS;DSN=Twister MySQL;"
   /PROCESS=ODBC
   /FIELD=(ACCT_NUM, TYPE=ASCII, POSITION=1, SEPARATOR="|", EXT_FIELD="ACCT_NUM")
   /FIELD=(TRANSTYPE, TYPE=ASCII, POSITION=2, SEPARATOR="|", EXT_FIELD="TRANSTYPE")
   /FIELD=(TRANS_DATE, TYPE=ISO_DATE, POSITION=3, SEPARATOR="|", EXT_FIELD="TRANS_DATE")
   /FIELD=(TRANS_AMOUNT, TYPE=NUMERIC, POSITION=4, SEPARATOR="|", EXT_FIELD="TRANS_AMOUNT")
This job replicates data from an Oracle table to a table in MySQL. The EXT_FIELD is the name of the column in the table. This handles the cases where the field name and column name need to be different.
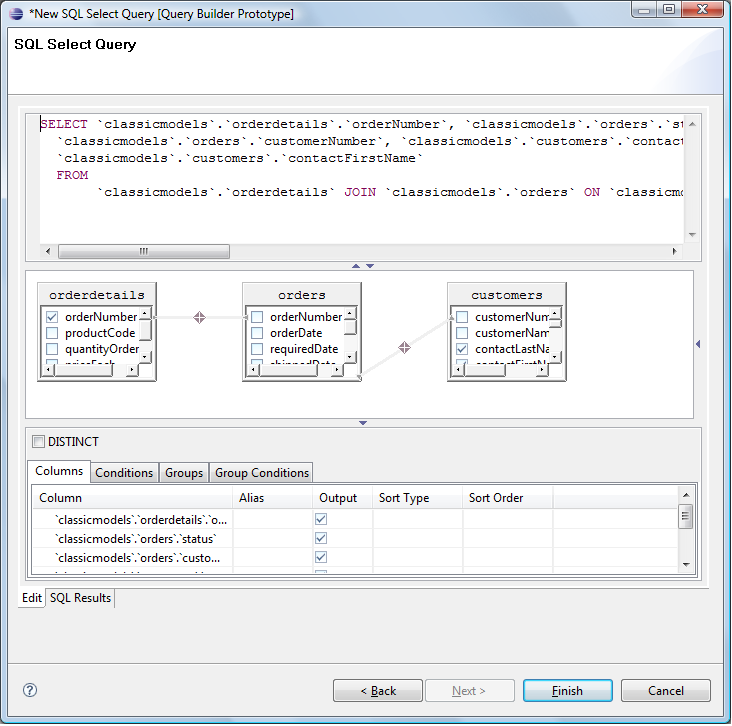
You can also use the built-in scrapbook feature to build and modify queries in a graphical editor:
Execute the final query in this window or the editing page shown above.
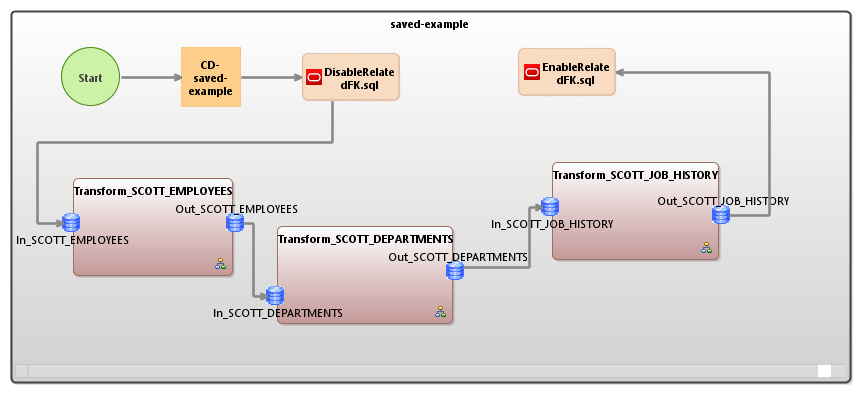
Once you have your saved statements or procedures in an .sql file, you can include them in a Voracity workflow like this one:
You can insert one or more “SQL Command” items from the workflow design palette at any point(s) in your job. For more information about designing visual workflows in Voracity, see these articles.
- You will also need an ODBC connection for data movement; i.e., to process database or other JDBC-viewed data directly in IRI software. See this article and contact support@iri.com if you need help with that.
