IRI DarkShield RPC API
Editors Note: The article below was written prior to the release of V5 of the IRI DarkShield PII data masking tool for structured, semi-structured, and unstructured data. Version 5, released in Q1, 2024, introduced separate APIs based on the one below — for files, relational databases and NoSQL databases. All four APIs are now also used to run search and mask jobs configured in the DarkShield GUI. DarkShield Version 6 will also feature a stateless, restful API option.
IRI DarkShield Version 4 features a Remote Procedure Call (RPC) Application Programming Interface (API) for searching and masking unstructured text. The API allows for the use of DarkShield’s search matchers and masking rules outside of the context of files.
This “Base API” is also the underlying technology used by the DarkShield Files API for performing search and masking operations specifically in free-form text, CSV/TSV, JSON/XML, PDF, Parquet, and/or image files residing on premise, or in cloud storage like Azure, GCP, S3 or OneDrive/SharePoint.
The DarkShield API is built as a plugin on top of the IRI Web Services Platform (codenamed Plankton), allowing the user to pick which services they will require while utilizing the same hosting, configuration, and logging capabilities provided through the platform.
This article covers the API’s core search and masking capabilities, and provides a few examples.1
The DarkShield RPC API is documented through an OpenAPI document, a JSON/YAML based declarative specification of the different endpoints supported by the API, the schemas of the request payloads and the expected responses, as well as examples that can be run against each endpoint.
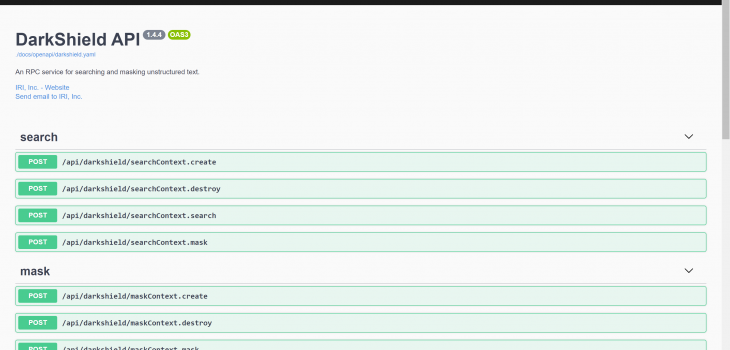
The screenshots used throughout this article are HTML-rendered views of DarkShield’s OpenAPI document. By default, all Plankton services use Swagger-UI to render the OpenAPI documents under the /docs endpoint, which provides a useful interface for executing examples.
In some cases we will also be showing Redoc-rendered versions for added clarity (certain OpenAPI V3 concepts like discriminators are not properly modeled in Swagger-UI).

For file-based search and masking, we also provide an additional plugin called the IRI DarkShield Files API. The files plugin utilizes the same search and matcher contexts that are defined in the base API discussed in this article, so we recommend that you read this article first before continuing on to the files article.
Running the API
To follow along the examples given in this article, we recommend that you look at our Plankton setup guide (packaged with the trial) for how to install and run the API. Once you launch Plankton, navigate to the location where the OpenAPI docs are hosted in your browser, which by default is on http://localhost:8959/docs.

Creating Search Contexts
Before we can begin using the API to annotate text, we must first define the search methodology that DarkShield will use. For that, we need to host a Search Context which defines a set of Search Matchers that we will use to match on the data, as well as a unique name so that we can send search requests to it.
If you select the /api/darkshield/searchContext.create endpoint, you will be shown a description of the endpoint along with a useful example for how to create one. You can also select other examples from the dropdown:
To execute an example, click on the Try it out button, which adds an Execute button on the bottom and allows you to modify the currently selected example in case you want to tweak it or create your own:
Click Execute to create the example Search Context which you have selected. On the bottom, you will see the curl command that can be used to execute the same command through the command line, as well as the response (which should return a 200 status code with an empty body for a successful execution):
You will note that the name of the Search Context has to be unique, and duplicate Search Contexts are prohibited. If you try to execute the same exact example again, you will get a 400 Bad Request response with an error message stating that the Search Context you were trying to create already exists:
If you wish to change a Search Context, you must first explicitly destroy it by calling the /api/darkshield/searchContext.destroy endpoint. All Search and Mask Contexts will also be destroyed automatically when the server stops, and have to be re-created when Plankton is restarted.
Search Matchers
The OpenAPI document not only provides examples for the searchContext.create endpoint, but also the schema for how a request payload should look like in order for a Search Context to be created. If you are still in example mode, click Cancel to return to the original view, and the click on Schema next to the Examples tab under the Request Body to view the schema for the endpoint:
From this view, you can see that a Search Context requires a name and a list of Search Matchers (with at least one Search Matcher defined). The name of the Search Matcher will be added to an annotation to indicate which matcher was used to annotate it.
Note that, unlike the Search Context name, the Search Matcher name does not have to be unique. For example, there are multiple ways to match on names, and each matcher can be named “NamesMatcher.”
Looking at the screenshot above, the schema for a Search Matcher does not give a lot of clues regarding what the required fields are, or what the type should be. This is a known limitation for Swagger UI since it cannot display all subclasses of the Search Matcher schema based on the discriminator value (in this case, the type field).
You can scroll down to the bottom of the page to view the Schemas tab that contains the various different subtypes of the Search Matcher. Or if you are using Redoc, you will be able to see more information:
On Redoc, you can toggle between the 5 different Search Matcher types, each of which have their own parameters and return their own annotations:
- Fuzzy Lookup (fuzzy): Searches for exact and non-exact matches within text using Levenshtein distance. Fuzzy Matchers can specify various matching criteria, like maximum Levenshtein Distance or the number of permitted deletions/insertions. Returns annotations that contain the Levenshtein distance between the match and the keyword that the matcher thought it matched.
- Named Entity Recognition (ner): Searches for a specific category of data that the OpenNLP-compatible model was trained on based on the sentence context in which that data could appear in (e.g., , names, addresses, dates, etc.). Can specify optional sentence detectors and tokenizer models, otherwise standard whitespace detectors will be used to split the text into sentences and tokenize them. Return annotations containing a statistical probability that the named entity was correctly identified.
- Pattern (pattern): A regular expression pattern with an optional validation JavaScript file for performing computational validation on matches (for example, calculating the checksum for credit cards). A pattern match can also be split into named groups, which is useful in cases where only a part of the pattern is of interest. Returns standard annotation which can optionally include the group that was matched from the pattern if named groups were specified (both in the pattern and the groups matcher parameter).
- Set File Lookup (set): direct lookup of entries from a set file. Can choose whether to match whole words and whether to ignore case. Return standard annotations.
- Transformers Named Entity Recognition (transformers): Searches for text that an NER model (of either the PyTorch or TensorFlow frameworks) has annotated. Either a name of a model on Huggingface Model Hub or the folder location of the model can be specified for both the NER model and tokenizer model. What labels to include in annotations can be specified by the entityLabels parameter. For example, an NER model may label different types of named entities (location names, peoples’ names, organization names, etc.) differently. By default, all entities labeled by the model are included in annotations. How entities are grouped can be tuned via the aggregationStrategy parameter. Returns annotations containing a statistical probability that the named entity was correctly identified.
Searching Text
Once we have hosted our Search Context, we want to perform an actual search against it. Scroll down to the /api/darkshield/searchContext.search endpoint and select the example that matches the Search Context that you have created previously:
The request contains the name of the Search Context that we want to use and the text that we want to search. If we click on the Try it out button and then click on the Execute, we can see the resulting annotations file that is returned from the API:
A list of annotations are returned, with each annotation containing the match, the name of the matcher that matched it, the start and end character offsets of the match, and the type of the annotation (which can help determine what additional fields could be defined for the match).
These annotations are in JSON and downloadable to a file. It is therefore possible to export your search results to third-party tools; for example, SIEM portals like Datadog or Splunk, or a data catalog like Alation.
If you are using multiple Search Matchers in a Search Context, there is a chance that overlapping annotations are produced (for example, if a set lookup and an NER model matches on the same name). In those cases, DarkShield only keeps one of the overlapping matches, preferring the left-most and longest match.
In the future, there may be additional strategies which can be specified inside of a Search Context for dealing with overlapping annotations.
If you pick an example for a Search Context which has not yet been hosted, you will see the following error, which states that the Context in question does not exist:
In a case like this, you can either select the correct example or create the Search Context which you are trying to use from the previous section.
Creating Mask Contexts
As a direct analog to a Search Context, we need to create a corresponding Mask Context which can be used to mask annotated text. A Mask Context defines a list of masking rules that should be applied, as well as a list of Rule Matchers which match annotations to their corresponding data masking rule (function).
Navigate to the /api/darkshield/maskContext.create endpoint:
You will note that the names of the examples correspond to the Search Context examples. However, it would be incorrect to say that there is a one-to-one matching between a Mask Context and a Search Context. That is because a Mask Context can be used to mask annotations produced from any number of Search Contexts, provided that the annotations match the criteria of the Rule Matchers.
To illustrate this point, we will first look at the definition of the Rule Matchers in Redoc.
Rule Matchers
A Rule Matcher is used to map an annotation to a corresponding Masking Rule. Currently, there is only one type of Rule Matcher, a Name Rule Matcher, which matches on the name of the Search Matcher that created the annotation using a regular expression pattern.
A Name Rule Matcher can therefore match on multiple different Search Matcher names, including all possible Search Matchers if an inclusive pattern is specified (for example, “.+” which matches on all possible sequences of ASCII characters).
Rule Matchers are applied in order, so a common strategy for making sure that all annotations are masked is to define the specific Rule Matchers first, and then more general Rule Matchers which can catch all non-matched annotations.
If no Rule Matcher matches on an annotation, that annotation will not be masked, and will be placed inside of the failedResults array along with the reason why it failed (because it could not be matched).
Masking Rules
Each Rule Matcher corresponds to exactly one Masking rule, defined in the rules array:
Currently, there is only one type of masking rule, a CoSort rule, which is defined using an IRI Domain-Specific Language (DSL) which is used in FieldShield. The DarkShield API delegates masking tasks to the underlying SortCL engine by generating the associated script.
Some examples of common rule expressions include:
- replace_chars(${NAME}, ‘*’): A character redaction which replaces the input with a sequence of masking characters, in this case an asterisk ‘*’.
- enc_fp_aes256_alphanum(${NAME}, ‘passphrase’): Generate ciphertext using format-preserving encryption.
- hash_sha2(${NAME}): Generate a hash from the input.
Note that the ${NAME} represents any arbitrary text, since DarkShield replaces it with an internal field name.
For more information about the different masking rules which can be used and the parameters for their expressions, consult the FieldShield manual.
Pseudonymization can be performed by specifying a path to a set file and leaving the expression field blank. The set file should contain two tab-delimited columns, the first specifying the text to match on and the second specifying the replacement. The set file must be sorted in ASCII order.
Masking Text
With the understanding of how Rule Matchers and Masking Rules work, we can now create a Mask Context from the list of examples. After clicking Try it out and Execute, you should see a results JSON payload in the response containing the masked text along with the results and failed results:
The results array contains a list of masked results, each with the original annotation that was masked, the new start and end character offsets relative to the masked text, the generated masked result, and the rule name that was used to generate it.
The failedResults array will contain any result which was not masked. There are many reasons for why an annotation could not be masked. For example, trying to apply a blur masking function on non-integer text will fail in the underlying CoSort (SortCL) engine.
Unmatched annotations will also be placed into the failed results. The failed result contains a reason key which gives a description of why the annotation failed to mask:
Each failed result contains the adjusted character offsets relative to the masked text, so it is easy to fix failed results in the already masked text in a subsequent masking call.
Search and Masking Text
After defining the Search and Mask Contexts to use, it is also possible to search and mask in the same pass. Just call the /api/darkshield/searchContext.mask endpoint with the names of the Search and Mask Contexts, as well as the text to mask; for example,
The results will be the same as those returned from the maskContext.mask call:
If you would have any questions about the DarkShield API, email darkshield@iri.com. For commercial inquiries, email info@iri.com.
You can also schedule an interactive discussion and demonstration around your use via https://www.iri.com/products/go/live-demo; just specify IRI DarkShield API as the topic.
- An online video introduction and demo is also available here.


