Testing with DB Subsets in a Jenkins CI/CD Pipeline
This Jenkins entry is the fourth in a series of articles on the use of IRI test data management software – that masks, synthesizes, or subsets data – to feed safe, referentially correct test data for DevOps to CI/CD environments. Prior articles showed examples of test data creation in IRI software and the use of that data in GitLab, AWS CodePipeline, and Azure DevOps.
In this article I will explain how to host Jenkins in a Google Cloud Platform (GCP) Virtual Machine (VM), and run an IRI database subsetting job to feed that data into a Jenkins pipeline. Subsetting produces a smaller, but referentially-correct copy of a larger database schema.
Subsetting is useful in software or database testing scenarios that do not warrant the (size) resources or (privacy) risk of using a copy of a production instance. Subsetting also preserves the business logic required in application testing, and when coupled with data cleansing and masking, the subsets are also sanitized and safe for use.

So how do continuous integration tools like Jenkins benefit users when coupled with test data generation tasks like subsetting? Imagine a scenario where you are regularly building and deploying your application code within a CI/CD pipeline. If your application consumes data from a database as part of its regular process, that process will need to be included in testing during certain stages of the CI/CD pipeline.
For example, if we need to run tests on a website build that displays users’ recent purchases from an online store, we will inevitably need to include tests related to the website’s ability to query and accurately retrieve data from a database. By integrating a subsetting and masking job into the CI/CD pipeline, we can create a comprehensive process in which we build and deploy these realistic, protected subsets alongside our application code to provide meaningful test data for use in the testing stages of the application’s CI/CD pipeline.
This article assumes a certain level of familiarity with Jenkins and the Eclipse IDE, as we will be using the Jenkins Editor in IRI Workbench – the IDE for IRI test data and DB operations, etc. In summary, this article will discuss:
- Creating a VM Instance and Installing Jenkins – we will use GCP to set up our environment and, then we will install Jenkins
- Automating Your Jenkins Pipeline via Webhooks – for the sake of automation we need Github to notify the Jenkins server when push events occur
- Creating a Jenkins Pipeline – a brief walk through / how-to refresher
- Supplying Test Data with DB Subsets – an overview of this test data generation method
- Installing Jenkins Editor into IRI Workbench – the handy tool for creating Jenkins files
- Creating a Jenkins File – to furnish specific instructions to the pipeline
- Configuring the Jenkins Pipeline to Run IRI (Test Data) Jobs – showing the Jenkinsfile syntax that instructs our pipeline to run the subsetting (batch) job script
- Triggering the Jenkins Pipeline from IRI Workbench – to commit and push our IRI project to Github, and trigger our Jenkins pipeline
- Summary – a synopsis of the whole process, and the benefits it delivers.
Creating a VM Instance and Installing Jenkins
First, we need to create a VM instance by clicking CREATE INSTANCE in the console panel provided by GCP.

Next we need to configure the Instance:


We next need to enable the firewall to allow HTTP/S traffic so that the Jenkins server can receive notifications for push events from GitHub (will be discussed later). After you are happy with the settings for the VM instance, click CREATE.
Once the instance is created we can start installing Jenkins and Git on it. That means in the Google Console panel, we need to open the SSH terminal:

Click on SSH under the Connect section to open a terminal to your instance:

My GCP instance runs Debian (Linux). I entered the following commands to set up Jenkins in it:
- sudo apt-get update
- sudo apt-get install git
- sudo apt-get install openjdk-11-jdk
- curl -fsSL https://pkg.jenkins.io/debian-stable/jenkins.io.key | sudo tee \
/usr/share/keyrings/jenkins-keyring.asc > /dev/null - echo deb [signed-by=/usr/share/keyrings/jenkins-keyring.asc] \
https://pkg.jenkins.io/debian-stable binary/ | sudo tee \
/etc/apt/sources.list.d/jenkins.list > /dev/null
- sudo apt-get update
- sudo apt-get install jenkins
With this, Jenkins should now be installed on our GCP instance. However, we still cannot access it until we configure the network interface. To do that, go to VM Details, and open default under Network Interfaces.
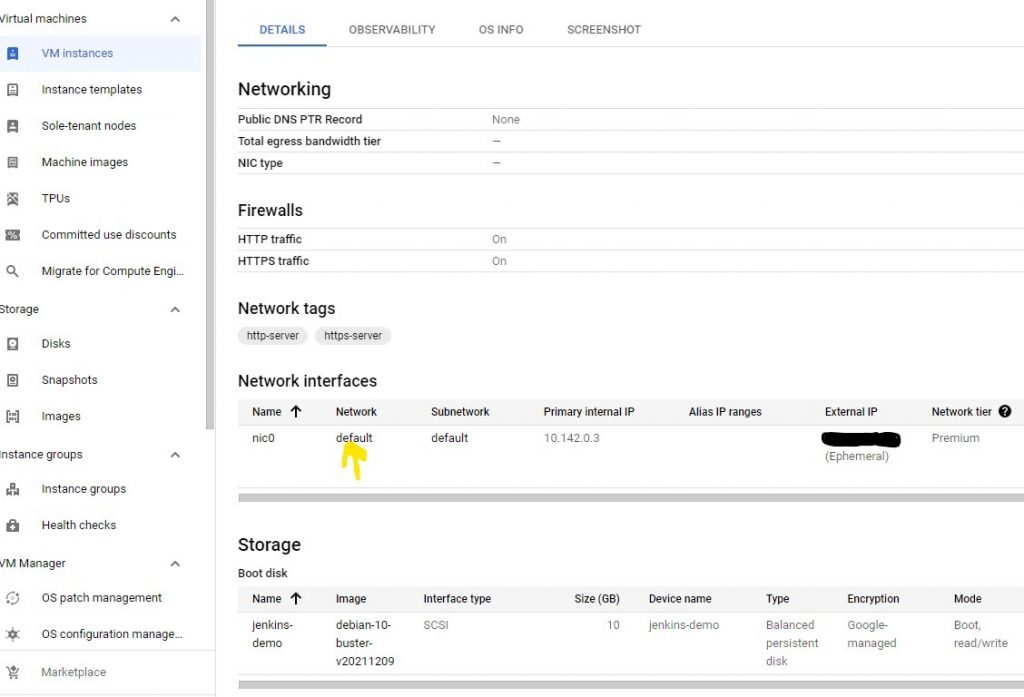
In the next window, select the Firewall Rules tab and then click on the Add Firewall Rule button.

When creating the firewall rule you will need to specify the port number to be used and the source IP range. In the case of Jenkins, it will be listening by default on port 8080, so it must be specified during the new firewall rule configuration stage.

If you have correctly added the source IP range and port number, you should now be able to access Jenkins from the external IP address provided by your VM instance.

Automating Your Jenkins Pipeline via Webhooks
Unless you only want to run your CI/CD pipeline manually or on a schedule, you will need to configure your Jenkins server to work with webhooks. Specifically, you will need to configure the Jenkins server to listen for push events on your GitHub repository via webhooks.
For those unfamiliar with Jenkins or webhooks, setting up a Jenkins pipeline with webhooks can be tricky. This helpful video shows how to create webhooks on Github, configure the Jenkins instance to listen for push events, and configure a pipeline that will react to said push events.
Creating a Jenkins Pipeline
After creating a user account and installing the default Jenkins plugins during initial setup, you should now be able to create a CI/CD pipeline. The initial pipeline setup can be seen in the previously shared video, but I will briefly walk through these steps.
First select New Item from the Dashboard page:

Next select Pipeline as the type of new item and click OK:

Now you will begin configuring your newly created pipeline through various lists of options. First, we will want to set the build trigger to utilize GitHub hook trigger for GITScm polling:

Next, we have to choose whether to configure the new pipeline to use a script located on the Jenkins server or a Jenkinsfile located in the target project’s repository that will contain the needed script. This script will be used as a set of instructions for the pipeline to follow.
I suggest a Jenkinsfile that will be located in our project’s repository. This will give us the freedom to manipulate the pipeline from within our IRI Workbench.
Therefore, we need to configure a few more things:
- The pipeline will use a pipeline script (Jenkinsfile) from SCM (Source Code Management)
- The SCM (in our case it will be Git)
- The repository URL of the project that will contain the pipeline script.

If we have chosen to utilize a Jenkinsfile located in a project repository we must then specify the path to said Jenkinsfile in the project’s repository. After this we can click Save.

Now we should have a pipeline that will trigger a build response when push events occur in the specified Git repository. Next, we can finally start writing our Jenkinsfile located in our IRI project that will give instructions to the Jenkins pipeline.
Supplying Test Data with DB Subsets
For this demonstration I created a simple subset job in IRI Workbench that will eventually be executed from the CI/CD pipeline. As mentioned previously, database subsetting is a valuable technique for test data generation and IRI Workbench supports the generation of Subsetting Jobs.

Discussing how to create subsetting jobs does not really fall into the scope of this article. To learn how to build structurally and referentially correct (and possibly masked) database subsets for application testing, see this how-to article.
Below is one of the underlying IRI task scripts for a command-line subsetting (batch) program:

The job above creates a subset table from a master table called CHIEFS. Notice that a masking (format preserving encryption) rule has also been applied to the NAME column to protect PII.
Installing Jenkins Editor into IRI Workbench
The Jenkins Editor is an Eclipse-supported plugin that assists in the creation of Jenkinsfile files. The Jenkins Editor also provides code completion and tooltips, syntax highlighting, and validation for Jenkins Linter and Groovy syntax. Because IRI Workbench is built on Eclipse, you can download the Jenkins Editor to help create and modify Jenkins pipeline files.
To install the Jenkins Editor plugin in IRI Workbench, the Eclipse Marketplace Client is required. If you have not already installed Marketplace Client, read this IRI blog article first.
The steps involved whereby the user accesses the Eclipse Marketplace Client and installs the Jenkins Editor are exactly the same between the IRI Workbench and a standard Eclipse IDE.
 Search for Jenkins Editor in Eclipse Marketplace or simply drag and drop into Marketplace from the plugin page.
Creating a Jenkinsfile
After installing the Jenkins Editor, IRI Workbench should now be able to support the creation of Jenkins files. To create a Jenkinsfile, add a new file to your target project and name it “Jenkinsfile”. The plugin will associate the name “Jenkinsfile” with a file made for the express purpose of providing instructions to a Jenkins pipeline.
Do you notice in the image below how the script has the syntax color-coded and correctly indented? When creating/editing larger Jenkins files where pipeline scripts are far more complex, the Jenkins Editor will surely come in handy.
 Color-coded Jenkinsfile using Jenkins Editor
Configuring the Jenkins Pipeline to Run IRI (Test Data) Job Scripts
Depending on whether or not you have the IRI SortCL engine installed on the same machine that is hosting your Jenkins server, your pipeline will execute your IRI job a little bit differently.
In a scenario where the Jenkins server is located on the same machine as the SortCL engine, the script below would be used to instruct my Jenkins pipeline to execute the batch file that was generated when I created my IRI subset job.
 SortCL engine is hosted on the same machine as the Jenkins instance
Alternatively, if my Jenkins server was not located on the same machine running SortCL, I would have the added step of first connecting to the SortCL machine via SSH. Otherwise, I would have to create a remote connection through some other means.
Using SSH would require the use of SSH Agent. In the pipeline script below you can see the syntax used to run a SSH task that would be used to execute the IRI job remotely.
 SortCL engine is not hosted on the same machine as the Jenkins instance, so SSH is used to connect
My credentials are stored in Jenkins and I have environment variables set up in Jenkins for the host address and the commands that would be executed. The $CMDS variable holds the commands that would be used to execute the IRI job script.
The command would look something like this:
C:\\IRI\\workbench-demos\\subset-demo\\subset-demo\\new_subset && .\\new_subset.bat
Triggering the Jenkins Pipeline from IRI Workbench
Because IRI Workbench supports Git Version Control we can commit and push IRI projects from Workbench. Remember that when a push event occurs the Jenkins pipeline we created will be notified by GitHub webhooks. This lets us trigger the Jenkins pipeline directly from Workbench.

When the Jenkins pipeline is triggered, the subset job runs on the command line and a table called SUB_CHIEFS will be created. Afterwards, you can see the results in IRI Workbench:
 Contents of the SUB_CHIEFS table viewed in IRI Workbench
From the image above we can see that a sub table called SUB_CHIEFS has been created and has been populated with ten records from the CHIEFS table. Values in the NAME column were also encrypted.
Summary
In this article, we have shown how to set up a GCP VM instance and install Jenkins on it. Afterwards, a Jenkins CI/CD pipeline was created and set to listen to webhooks from our target GitHub repository.
We then discussed the Jenkins Editor, and how it can make configuring Jenkins files in IRI Workbench easier. Finally, we discussed and showed examples of how a Jenkinsfile would be written to run an IRI subsetting job using the SortCL engine hosted on the same – or different – node.
As mentioned earlier, subsetting is useful for testing and development purposes. For example, developers may want to work with production data in a test environment but either do not want to or cannot afford to provide the necessary resources for a duplicate of their entire production database.
It can therefore be useful to have a smaller copy of the database with referential integrity still intact. Furthermore, by incorporating masking methods inside the process of subsetting, we are left with realistic data with its PII sanitized.
Considering that an application may require test data during the testing stages of a DevOps process, it only makes sense to integrate subsetting into the operations of the CI/CD pipeline. By doing so we create one comprehensive process where we can build and deploy our test data/databases alongside our application code to provide meaningful test data that will be consumed in the testing stages of the pipeline.
