Masking PHI in HL7 EDI Files with DarkShield
Introduction
The IRI DarkShield data masking product now includes fit-for-purpose wizards in the IRI Workbench IDE to search (classify) and mask (remediate) sensitive ”dark data” (as defined by Gartner) in many semi, unstructured, and structured file, NoSQL, and relational database (RDB) sources. This article focuses on a new wizard designed to help you discover and de-identify PHI in healthcare documents in Health Level Seven (HL7) v2.x format.
Though not discussed in this article, DarkShield also includes wizards for other sources, like the New File Search/Masking Job … wizard for sensitive data in files, the New NoSQL DB Search/Masking Job … wizard for sensitive data in a NoSQL database, and the New Relational DB Search/Masking Job … wizard for sensitive data inside RDB.
What the DarkShield Healthcare Wizard Does
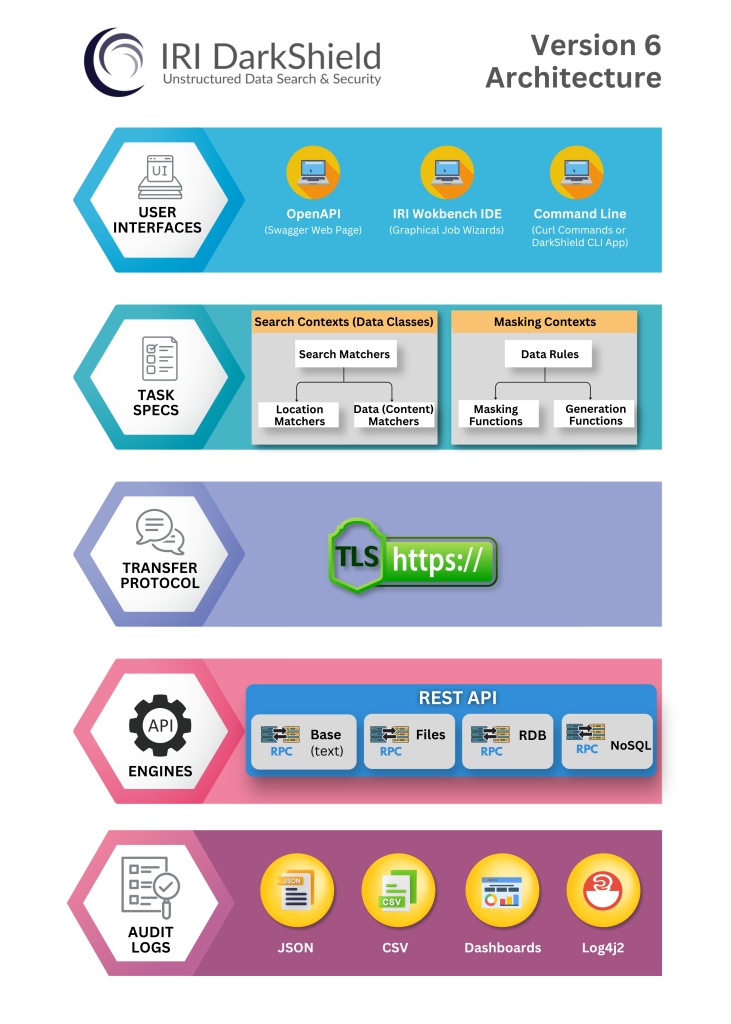
The “New Healthcare Search/Masking Job …” wizard in the IRI Workbench GUI for DarkShield creates a DarkShield Job (.dsc file) with the Search and Mask Contexts applicable to your job.
Search Contexts contain instructions on how to search for PII and its source. Mask Contexts contain instructions on masking the PII found during the search operations, and how to access the target where the masked version of data will be sent.
The searching and masking of data in HL7 documents is based on Data Classes you pre-define and store in an IRI Data Class and Rule Library or while creating this DarkShield job. Each Data Class contains one or more search methods called Search Matchers used to identify PII.
HL7 documents specifically use Location Matchers but other matchers can be used in unison to broaden the search range. For more information on the various search methods available, read about Data Matchers and Location Matchers.
While DarkShield previously supported HL7 documents, it has now been enhanced with a user-friendly front-end interface. Additionally, DarkShield has undergone improvements, now accommodating sub-fields and repeating segments, topics we will delve into later in this article.
Prerequisites
You may need to update your DarkShield API and Workbench IDE; see this YouTube video for instructions, and email darkshield@iri.com if you need help or have any questions. Before launching the DarkShield Healthcare wizard, ensure these preliminary steps are completed:
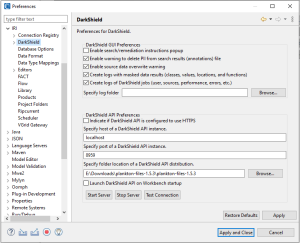
1. First, verify that the DarkShield API distribution directory is specified in IRI Workbench Preferences > IRI > DarkShield. From here, you can configure DarkShield GUI and API preferences, including the host, port, and directory holding the DarkShield API:
2. If the DarkShield API distribution (Plankton) has not been specified in Preferences or your DarkShield Job will be using a different DarkShield API distribution, you will need to manually change the specified folder in the image above to reflect where the DarkShield API is located.
3. Second, all DarkShield Wizards require a project possessing an IRI Data Class and Rule Library. The library can be empty, as this wizard can create data classes and rules on its own without the user needing to set them up. To learn more about IRI Data Class and Rule Library and creating Data Classes and Rules, read this article.

IRI Project Containing an IRI Data Class and Rule Library
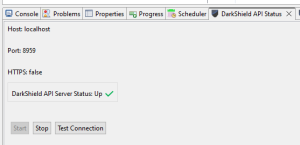
4. Finally, verify that the Plankton (DarkShield API) server is running. This can be done by opening the DarkShield API Status view (bottom of the screen). This view displays information about the DarkShield API, including whether it is currently running.
Using the Wizard
To access the wizard, navigate to the DarkShield menu dropdown and choose ‘New Healthcare Search/Masking Job…’.

This action opens the first page, where you will specify the source type, in this case, HL7. Wizards for a variety of common X12 formats will be added here shortly.
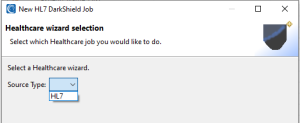
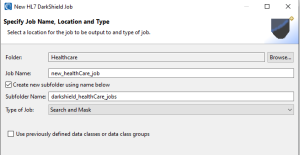
After selecting the source type, the next page will prompt you to specify the name and location of the DarkShield job you are building. You also have the option to use previously created Data Classes or Data Class Groups.
If you do, this streamlines the process of setting up the job without more steps by leveraging the classes that have already been defined or modified in the library or previous use of this wizard.
If this is your first time defining a DarkShield job for HL7 however, we recommend that you do not use this option. The next pages of the wizard will take you through the very specific types of HL7 data segments you need to classify.
After the setup page is the PII General and Advanced Selection Page. Here, predefined “groupings” 1 of common Personally Identifiable Information (PII) or Protected Health Information (PHI) types found within healthcare documents are presented.
It’s important to note that while these groupings cover many PII instances, they may not encompass all of them within a document. Therefore, you should carefully review all information during job creation to ensure the accuracy of your data discovery and de-identification results.
On this page, we can select these groupings for easier searching and masking of PII / PHI:
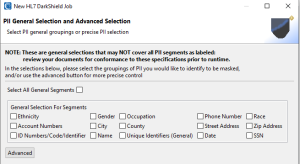
The “Advanced” section of the wizard gives you more granular control over the segments, fields, and sub-fields to define for searching and masking purposes. For this example, we will be using both a general selection (Street Address) and a few advanced selections.
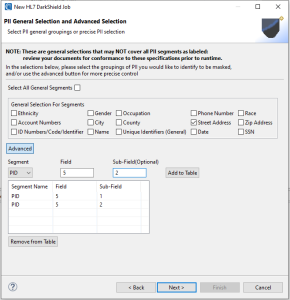
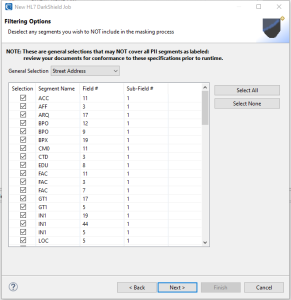
This next wizard page enables you to filter out any unnecessary information from the general grouping selection, made on the previous page. Filtering of this kind can improve job speed.
Here, you’re presented with a list comprising the ‘Street Address’ general selection. If your documents don’t contain any segments from this list, there’s no need for filtering, as they will be automatically skipped.
However, if you prefer not to mask any of this information, you can simply deselect it from the table. For the sake of this example, we’ll keep all the information selected.
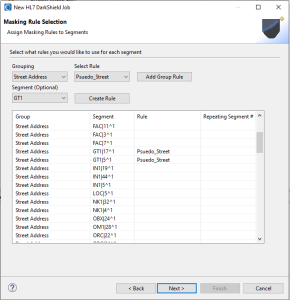
The next wizard page is the ‘Rule Selection Wizard Page,’ where you associate the information selected in previous wizard pages with masking rules. Note that any information lacking a rule will be skipped during the search and masking process.
On this page, you’ll find a grouping dropdown menu, allowing selection of a grouping that was declared in an earlier wizard, including information from the advanced selections. Once a grouping is selected, you can add a rule directly to the entire group by choosing a rule from the dropdown menu and clicking the ‘Add Group Rule’ button.
There is also an optional dropdown menu labeled Segment. This permits the application of a rule solely to the selected segment within the grouping.
Within the table, you can also click on, and directly modify the rule cell using a dropdown menu to select a rule for a specific item. This provides even more granular control of the masking job.
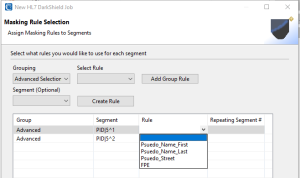
The “Create Rule” button allows you to create a rule directly from this wizard. For more information about creating a rule, or what the masking rules are, refer to this blog article.
The final option on this page is the “Repeating Segment #” column in the table. This is designed to be used with documents that contain duplicate segments as noted by duplicate NK1 segments in this example:

If there are duplicate segments, you may need to represent them within the table. The “Repeating Segment #” defaults to the first occurrence of the segment.
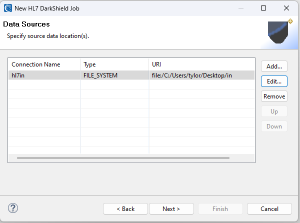
The last two wizard pages are used to define or modify the locations of your unmasked file sources and masked targets. You can specify local PC or LAN file system paths or cloud buckets; each target file will have the same name as the source. If you specify more than one target, the masked files will be copied into every defined folder.
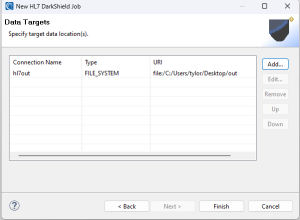
When you click finish, the DarkShield job configuration (.dsc) file will be created in the “Project Explorer” folder specified on the first wizard page. A new HL7 data class group will also be created inside the “iriLibrary.dcrlib” in your project, which contains the data classes you just defined in the wizard.
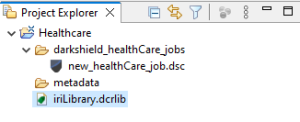
Within these Data Classes, every detail can be altered without the need to revisit the wizard. This flexibility enables you to modify, add, or remove any Data Classes, significantly reducing setup time for future jobs, especially if requirements change.

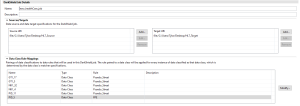
Double-click on your .dsc file to see the ‘DarkShield Job Details Page’. Review the source, target, and data class information. It’s important to note that any changes made to items within the .dcrlib file require selecting the ‘Modify’ button and completing the wizard to ensure those changes are reflected in the .dsc file.
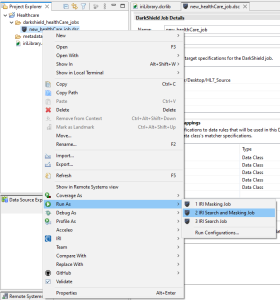
To run your job, right-click on the .dsc file and select the type of job you want. In this case, I am choosing a combined search and masking job.
Upon examining the sample HL7 source and target file below, we can see the PII masked in various ways, including pseudonymization and format-preserving encryption (FPE) for realism. Many other masking (and data generation) functions are supported; see this page.
Sample HL7 Source File:

Masked Target:

In addition to the masked files, an audit log file called results.json log is generated. It details which data classes matched on information in the HL7 file(s) and the corresponding rules used to mask it. It is also possible to generate aggregate visualization of the discovered PII and whether it was masked in built-in dashboard charts per this article.
If you would like help using this wizard to scan and/or mask data – or with any other data source(s) – please contact your IRI representative or email darkshield@iri.com.


