Send Data from IRI Jobs & Logs to Splunk…
Production or test data targets, as well as the operational log data, created by SortCL-compatible data manipulation or generation jobs in the IRI Voracity data management platform and its included tools (IRI CoSort, NextForm, RowGen, FieldShield) are all machine-readable. As such, that data can be forwarded automatically to Splunk for analytics, dashboarding, alerts, etc. through Splunk Universal Forwarder either ad hoc, scheduled, or in near real-time. This article explains how to establish and test the connection.
In our sample use case, several CoSort data manipulation jobs will create target files that get written into a certain directory. We will configure Splunk Universal Forwarder to dynamically sense and send all new or changed files in that folder into Splunk.
You might compare this method to the Voracity Data Munging and Masking App for Splunk or the older Voracity add-on for Splunk, which both also effect seamless data flows into Splunk from the results of script-driven jobs like CoSort. The app / add-on method is more job-centric and less automatic; a new script must be specified and run for each joint operation to happen.
At press time, the instructions consolidated below for our purposes were ultimately derived from the ‘Splunk Cloud User Manual’ and these pages in particular:
docs.splunk.com/Documentation/SplunkCloud/7.2.4/User/ForwardDataToSplunkCloudFromWindows
docs.splunk.com/Documentation/SplunkCloud/7.2.4/User/ForwardDataToSplunkCloudFromLinux
docs.splunk.com/Documentation/SplunkCloud/7.2.4/User/ForwardDataToSplunkCloudFromOSX
To set up Universal Forwarder, enter your Splunk instance and then click on App: Universal Forwarder.
Download the Splunk Universal Forwarder from the Splunk Downloads web page. This downloads as a msi file that you can run. Also download the customized universal forwarder credentials package.
The file downloaded should be similar to this:
When the .msi file runs, a wizard walks you through installation. There are a few things to keep in mind, however.
In the first step, uncheck Use this Universal Forwarder with on-premises Splunk Enterprise if you are using Splunk Cloud. Be sure to click on custom setup to get more options, such as setting the sources from where data will be forwarded.
In the next step, enter your Splunk Cloud hostname in the Hostname or IP field. Replace https:// with input-. An example could be: input-prd-p-z41nh2qlt7cx.cloud.splunk.com
Enter 8089 as the port number (the default). The Splunk Universal Forwarder will install into your Program Files directory by default. Now, make sure the Splunk Universal Forwarder credentials have been downloaded from the App:Universal Forwarder page in Splunk.
In command line mode (Start cmd), enter this statement to install the credentials:
splunk install app <full path to splunkclouduf.spl>
replacing “<full path to splunkclouduf.spl>” with the actual full path. For this to work, you must first change directory to
C:\Program Files\SplunkUniversalForwarder\bin> using the cd command.
Finally, run the command splunk restart. Splunk should now recognize the forwarder.
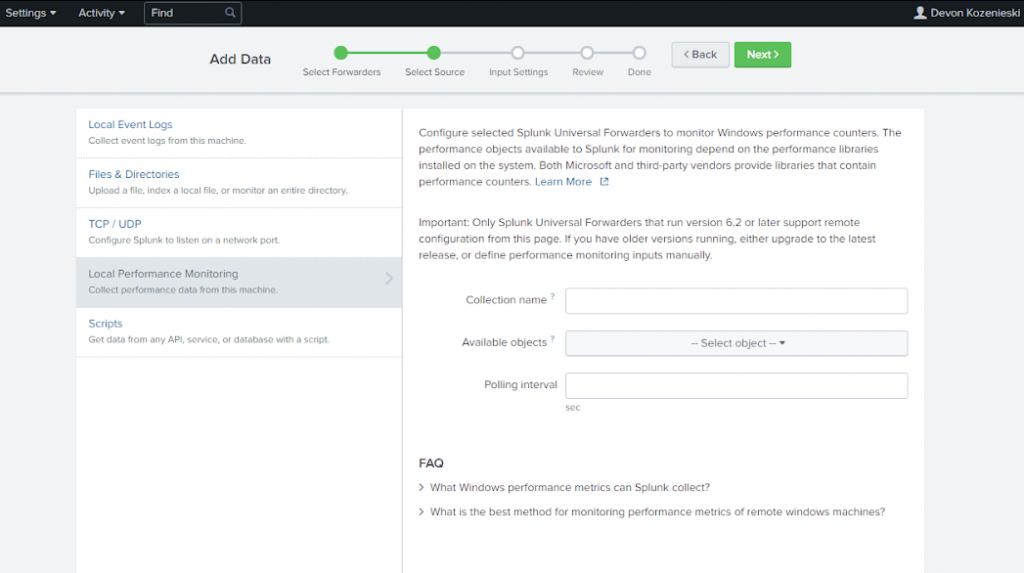
To set up a source for data to be forwarded, go to Settings > Add Data in the top Splunk menu. This should lead to a screen something like this if the forwarder has been set up correctly.
Select the host to forward from, then pick a Server Class Name that will help you identify what kind of files and data are being forwarded from the location you will select later.
In the next step, you can select a source to be monitored for data to be forwarded. Data can be forwarded from a wide variety of sources, including local event logs, files and directories, TCP/UDP ports, local performance, and data from any API, database, or service with a script.
In this case, we will be using a directory that a CoSort SortCL programs will target for their output. Our raw input data sample is a file called employee.txt:
I used the IRI Workbench IDE’s “New Sort Job …” wizard to automatically generate SortCL metadata and transformation parameters. The job shown below sorts the input file by Last Name, reformats it into CSV file, and writes that target into a folder I set up to be monitored by Splunk Universal Forwarder.
Once the job runs, the file outputs very quickly into the folder and is automatically indexed into Splunk. Here is an image of that intermediate CSV file:
Back in Splunk, once your source is selected, it is possible to specify the input settings, or what kind of files you are expecting to be forwarded. This will help Splunk intelligently format the data while indexing it. In this step you can also select which index in Splunk will receive the data from the forwarder.
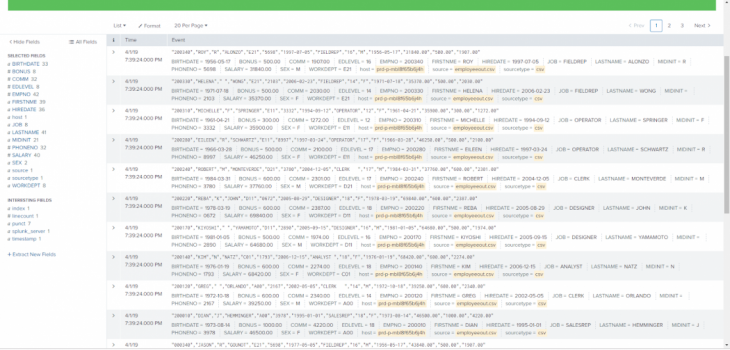
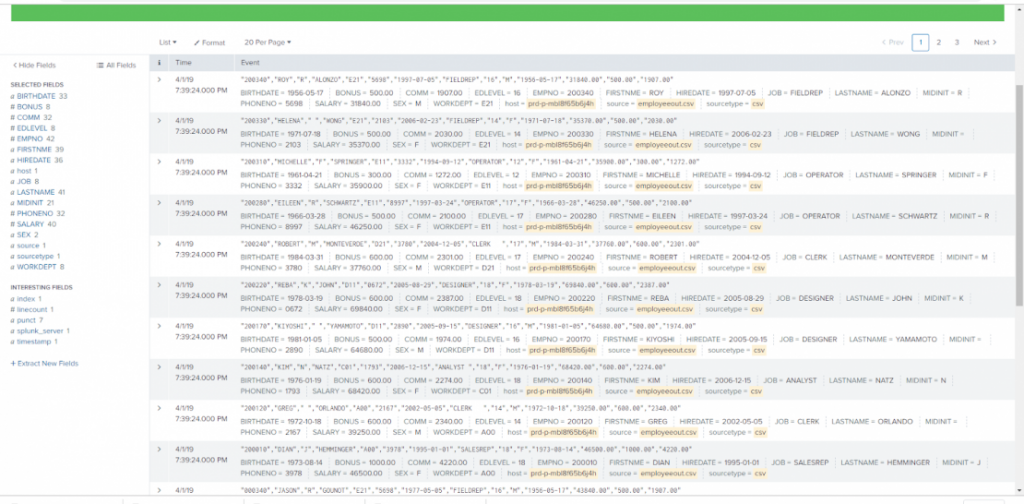
Back in Splunk, once your source is selected, it is possible to specify the input settings, or what kind of files you are expecting to be forwarded. This will help Splunk intelligently format the data while indexing it. In this step you can also select which index in Splunk will receive the data from the forwarder. Once indexed, the data will be available in Splunk:
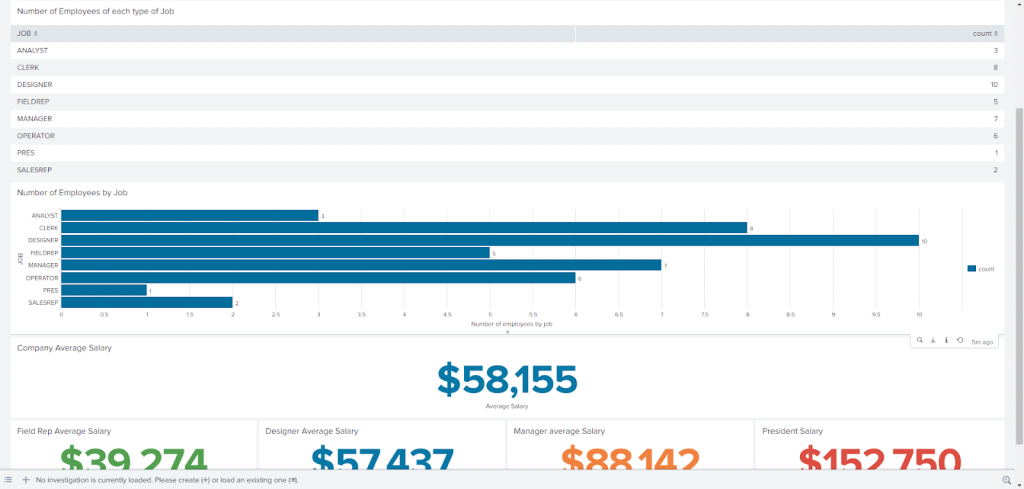
Of course, once the data is indexed in Splunk, visualizations are possible. Here are a couple of them that I created for a dashboard based on the employee data from the file I indexed to Splunk:
If you have other IRI jobs or logs to forward to Splunk, just add another forwarder source. For each source, navigate to “add data” in the Splunk interface, choose forwarder, select your forwarder, then specify where the data will come from and, optionally, the file type (which Splunk may also detect). You can add as many forwarding sources as need to.
Bottom line: The Splunk Universal Forwarder allows for easy integration with IRI Voracity or its subset products to combine the functionality and benefits of both vendor platforms seamlessly.


