Data Classification in IRI Workbench
EDITOR’S NOTE: The information documented in this article applies to IRI Workbench versions released prior to Q4, 2023. For more recent information, please refer instead to this article.
Users of PII masking tools like FieldShield, DarkShield, and CellShield EE in the IRI Data Protector Suite or Voracity platform can catalog and search their data — and apply data transformation and protection functions as rules — using built-in data classification infrastructure in their common front-end IDE, IRI Workbench, built on Eclipse™.
Multi-source data discovery (search) facilities in IRI Workbench can make use of the data classes you’ve defined, or they can help you assign data classes or data class groups to your data based on your search results, business rules and/or domain ontologies.
You can use your data class library in reusable field (e.g., data masking) rules. And you can assign those rules as you auto-classify data, too.
These features provide convenience, consistency, and compliance capabilities to data architects and governance teams. See this article for an end-to-end example of using data classes to find and mask data consistently across multiple tables in RDB schemas.
This article describes how you can define these classes. There are related articles on data class validators which can be used to distinguish and verify data based on pattern searches.
Several other articles in the IRI blog cover the application of data classes in various (mostly data masking) contexts. For a complete index of these articles, see this section of the IRI software self-learning page.
Create Data Classes
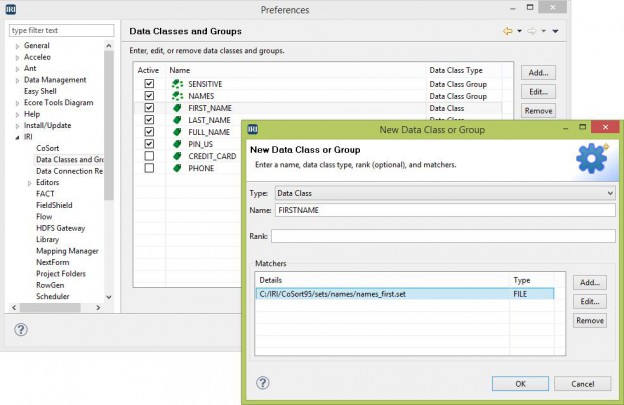
The classification starts by setting up data classes in the Workbench Preferences screen, which allows you to use classes globally, across multiple projects in your workspace. Workbench has some classes pre-loaded, including the FIRST_NAME, LAST_NAME, and PIN_US classes used in this example.
The data classes work by matching (1) the name of the class to the name of the field, (2) a pattern to the data in the field, or (3) set file contents against the data in the field. The first item is done for you automatically in the classifying process, if that option is chosen. You can add as many patterns and set file matchers as you need for each class to return your intended results.
Entering a regular expression as the data class name is an additional way to match on column name. For instance, there may be a column named LNAME or LASTNAME. So, I can use L(AST)?[_-]?NAME (underscore and dash in the brackets) to capture a few variations of LAST NAME.
You can also make your data classes and groups inactive. If you have a lot of classes but want to filter out the items not used in your particular project, you can make them inactive. This allows you to retain a copy of them but not clutter the drop down list that uses these classes.
Data Class Groups
You can also have data class groups. For instance, the included group “NAMES” contains the data classes FIRST_NAME, LAST_NAME, and FULL_NAME. If you want to apply a rule to multiple classes, you can use a group instead of selecting data classes individually.
For this example, I removed the underscore from the FIRST_NAME data class to demonstrate the name matching option of classification.
Data Classification Source Wizard
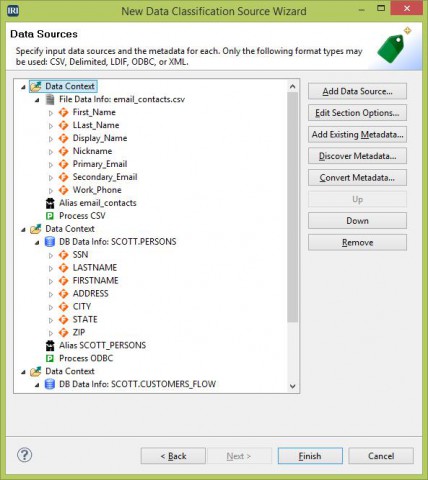
Once the matchers have been added to the needed classes, you can run the Data Classification Source Wizard. The wizard accepts the following data formats: CSV, Delimited, LDIF, ODBC, or XML. This wizard provides the means to select sources for your data class library for classification later.
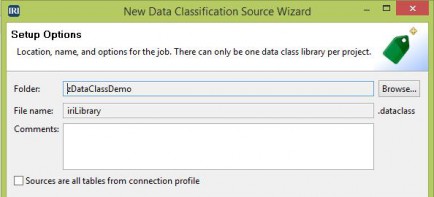
On the setup page, begin by selecting the location of your new “iriLibrary.dataclass” file, which is the output of this wizard. The file name is read-only because there can only be one of these file types in each project. You can also select the checkbox if all of your sources are tables in a connection profile.
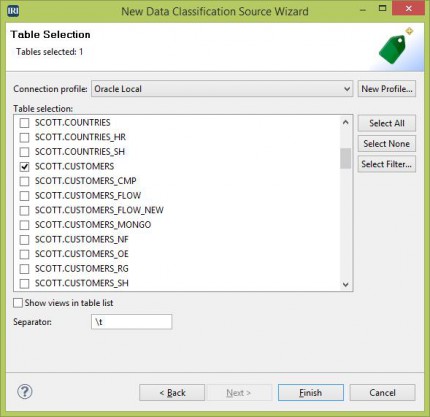
Selecting this box opens an input page like the one below where you can choose the tables to be included:
If the checkbox is not selected, you can add files or ODBC sources in the same input screen. On this type of input page, you will also need to add the metadata for each source. In this example, I have included a CSV file and two Oracle tables.
If you need to search and classify data across one or more full databases schemas at once, use the Schema Pattern Search and Schema Pattern Search to Data Class Association wizards.
Clicking Finish will create a data class library with the selected sources included. The data class form editor that opens will allow you to classify the data in those sources.
Classifying the Data In Your Selected Sources
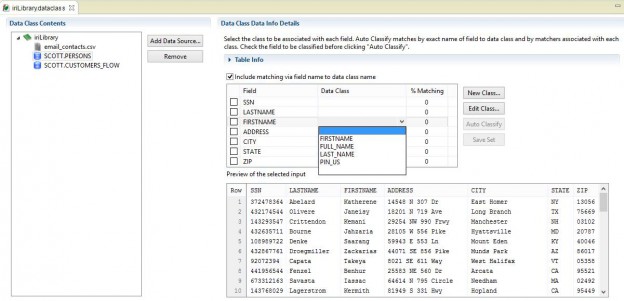
You begin the classification process by clicking one of the data sources to display the details about that source. The upper part of the screen has an expandable section that shows the file or table details.
The classification section starts with a check box to include matching via the field name to data class name. For example, I have a data class called FIRSTNAME and a field called FIRSTNAME (the matching is case-insensitive).
In this case, the classification process will select that data class for that field without reading the data content.
The next section displays a table containing field names with checkboxes, a column for the data class, and a column for the matching results. The lower table is a preview of the data in the source. The needed data classes should have been created before using this form editor, but you can add or edit them here.
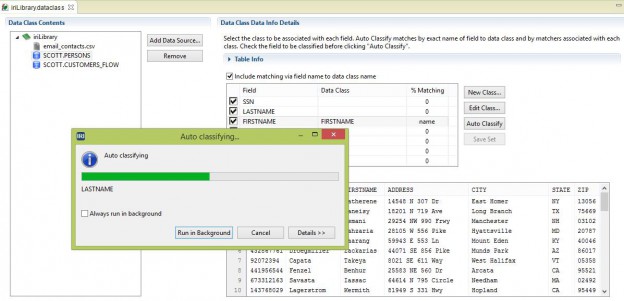
You can manually select the data class by clicking the drop down box in the data class column of the field you want to classify. You can also click Auto Classify and select the fields you want to classify. Clicking OK will start the automatic classification process, which can take a long time depending on the amount of data you have in your source.
The process can run in the background if you select that option in the standard Eclipse dialog that displays. Additionally, you can view the process status in the Progress View.
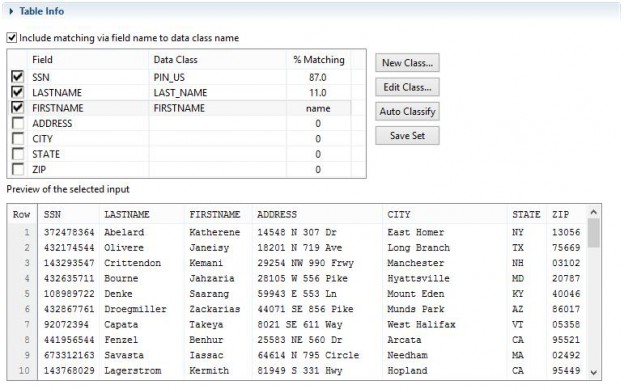
Upon finishing, the data class and data class map will be created in the library for the selected fields. In this example, the classification process found an 87% match on the SSN field, 11% on LASTNAME, and a name match on FIRSTNAME. The percentages indicate the amount of matched data in your source via the matchers for that data class.
If “name” displays in the matching column, then the data class was matched based on the name. If you manually selected a data class, then “user” will be displayed in the matching column.
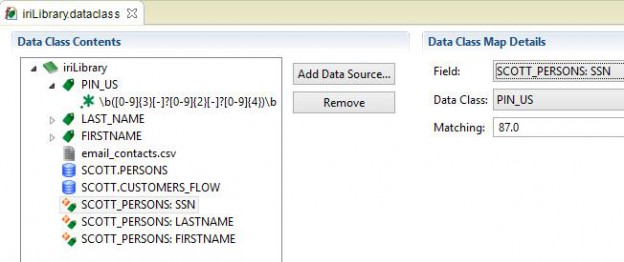
The final library contents are displayed below. Just as you can see the details of the sources, you can also click the data classes and maps to display their details.
The data class maps use references to the data classes and fields, which is the reason the library stores the sources and data classes, in addition to the map itself. Deleting a source or data class will also remove any associated data class map that references that deleted item.
When clicking Remove, a warning is displayed to remind you of this. The process can be repeated on the other included sources, and additional sources can be added at any time.
The classification results of this library can now be used to apply field rules to those data sources. The process is explained in my next article on Applying Field Rules Using Classification.







4 COMMENTS
[…] this section provides a small introduction to Data Classification, you may find it useful to read this article that explores the topic in […]
[…] sources on the bases of centrally defined data classes, which other articles in this blog (like this one) detail. This example only shows the masking aspects however, based on exported […]
[…] patterns or file lookups. If only a few, selected structured files need to be searched, use the Data Class Library editor for faster […]
[…] patterns or file lookups. If only selected tables or structured files need to be searched, use the Data Class Library editor for faster […]