How to Build Realistic but Fake PII
There are times when it is necessary to test with or share data that has elements of personally identifiable information (PII). To comply with data privacy laws and prevent a data breach, you may need to provide data that reflects, and sometimes imparts, critical information, but still protects the PII.
This article shows how you can build realistic, and privacy-law-compliant, test PII data using a variety of features in the IRI Voracity data management platform and its core SortCL program. SortCL is the 4GL for data definition and manipulation best known to IRI CoSort users, and the parent program of IRI FieldShield (for PII discovery and masking) and IRI RowGen (for test data generation).
Voracity includes FieldShield and RowGen, plus a DB subsetting wizard that can produce realistic, referentially correct test data. But this article shows a fourth path through Voracity that combines these technologies through the parent SortCL program.
We will demonstrate how you can use this functionality in Voracity to:
- disguise PII
- impart other information that is not sensitive
- maintain the original structure of the data.
All these features are supported in the same, free Eclipse graphical IDE for Voracity — and all IRI products — called IRI Workbench.
Define the Objectives
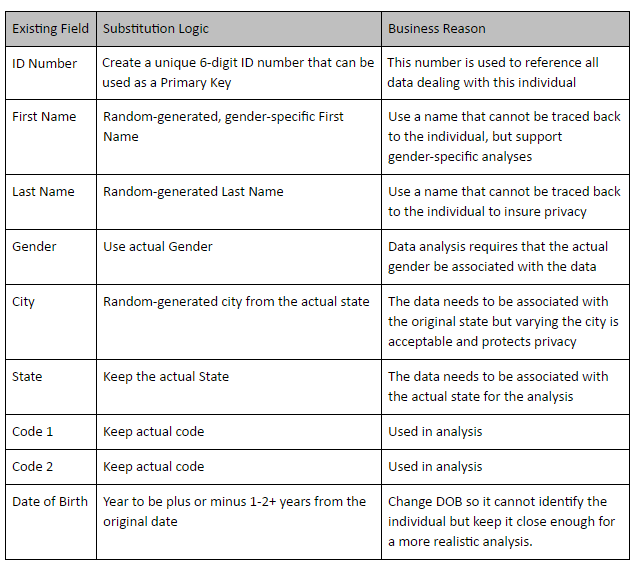
The chart below shows us the requirements for our test file. The original data from this file might come from health, insurance claim, and/or personnel records.1
 Our test targets can be one or more of the following:
- flat-file
- database table
- formatted report
- structured data stream (pipe, procedure, broker)
To create the fake data, we need to start with real data. It will be used as a guide for creating the field values for our target. The final output will be sorted by an encrypted ID Number.
To automate the creation of our job, we will use a wizard in IRI Workbench to produce a SortCL script. Once created, the job script can be used on any server where SortCL is installed.2 There are multiple ways to create, modify, and run these scripts in IRI Workbench. But this article focuses mostly on the script result, so you can see what happens “under the covers.”
Our job script will have an:
- INPUT section to define the fields as they exist in our original data source
- INREC section to redefine some of the input fields and create new fields. All fields used for processing in the output must be defined here. We are using this phase to remove unnecessary input fields and the consolidate common input fields from disparate metadata. If all the processing can be accomplished in the OUTPUT section, this section is not required.
- ACTION section to sort or copy data from INPUT or INREC, and pass it to the output
- OUTPUT section where final processing, values, and formats are defined for each target
Define the Methods
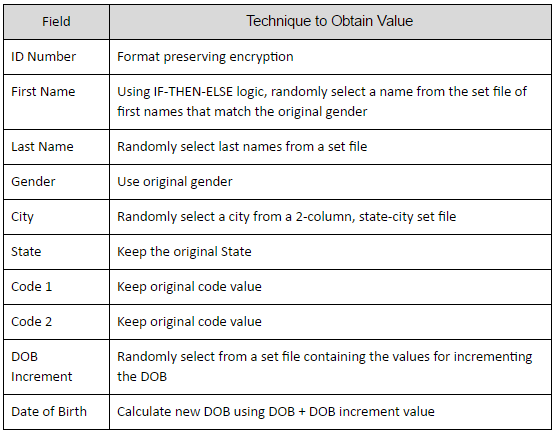
This chart outlines how the original real data will be changed:
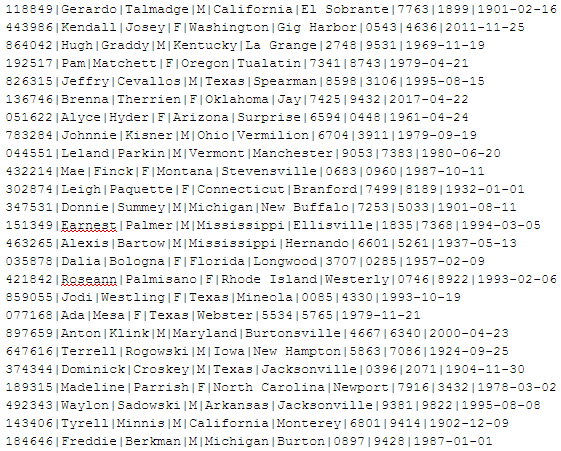
Here is a sample of our input file called RealData which contains the original values:
We will use graphical wizards and dialogs in IRI Workbench to build our job script.
Be sure to first create a project where all the files will be saved. Click on it to make it the active project for all of our design work. I called my project FakeData.
Before we can start, we must ensure the fake values we need will look realistic. One method is to draw from the values in “set” files. Set files are composed of one or more columns with known acceptable values. The columns must contain ASCII readable characters and be separated by a tab.
Here are the set files we need:
- male first names
- female first names
- last names
- states and associated cities
- values for incrementing DOB
IRI provides all of these except the last. That one we need to create. The incremental values need to be in days; therefore, if we want to increase DOB by one year, the increment is 366 days. To vary the month and day, we can use both negative and positive ranges of values; e.g., -742 thru -366 and 366 thru 749.
Create the DOB Increment Set
There are several kinds of set files that you can build in IRI Workbench, including a numeric range.
Follow these steps to build dob_increment.set:
- Click on the RowGen (windmill) icon on the IRI Workbench toolbar. Select New Set File from the menu.
- In the New Set File Wizard Selection dialog, select Range or Literal Values and click Next.
- In Setup Options, type dob_increment for File name. .set will be added to the end of the name. Click Next.
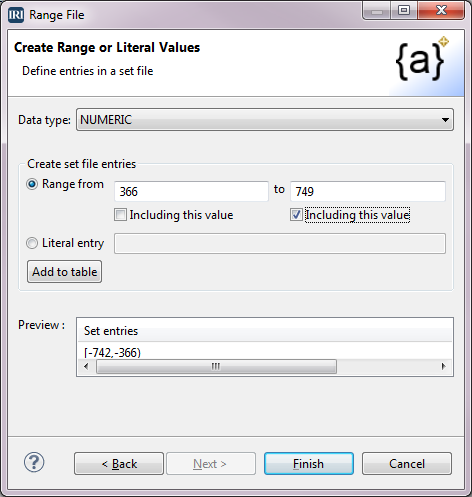
- In the Create Range or Literal Values dialog, select NUMERIC from the Data Type dropdown.
- Select Range from under Create set file entries.
- In the field to the right, type the value -742 and then -366 in the next field.
- Under the field with the -742 value, select Including this value.
- Click Add to table.
- Do the same for first the 366 value and then the 749 value.
- Select Including this value under the 749.
- View these values in the Preview box and then click Finish.
Create the Job Script
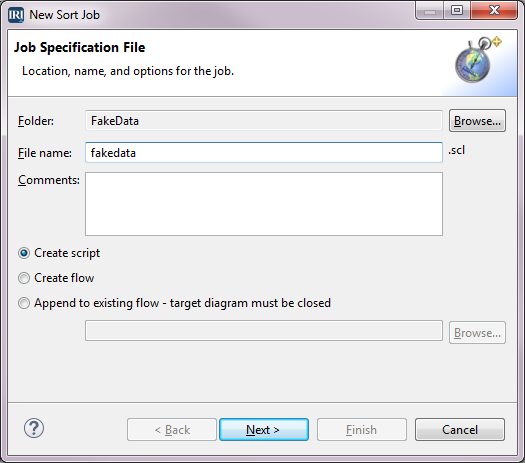
Even though we will be using multiple de-identification techniques, we can build our entire job with the New Sort Job wizard (since the target will be ordered by IDNUM). Launch the wizard from the CoSort menu (stopwatch icon) on the IRI Workbench toolbar:
I am calling my job script fakedata.scl. Be sure Create script is selected, then click Next to go to the Data Source dialog.
- In the File name field, type in fakedata, then click OK. The .scl will be added for you.
- Click Next to go to the Data Sources dialog.
- Click Add Data Source. In the Data Source dialog, make sure Files is selected; then type RealData in the field.
- Click OK to go to back to the Data Sources dialog.
- Now define the metadata by selecting Add Existing Metadata or Discover Metadata. See an example of how data sources and their metadata (.ddf details) get defined in this article.
The names and data TYPES for the input fields are:
- IDNUM, TYPE=ASCII
- FNAME, TYPE=ASCII
- LNAME, TYPE=ASCII
- GENDER, TYPE=ASCII
- STATE, TYPE=ASCII
- CITY, TYPE=ASCII
- CODE1, TYPE=ASCII
- CODE2, TYPE=ASCII
- DOB, TYPE=ISO_DATE
After defining that Data Source, select Pre-Action Layout in the Data Sources window.
Define the Pre-Action / INREC Section
The Pre-Action, or INREC, phase is where you change the value of fields, or create new fields, before they move into the ACTION and OUTPUT phases. For this job, we want to sort on the encrypted IDNUM field.
- In the Pre-Action window, select Add Pre-Action
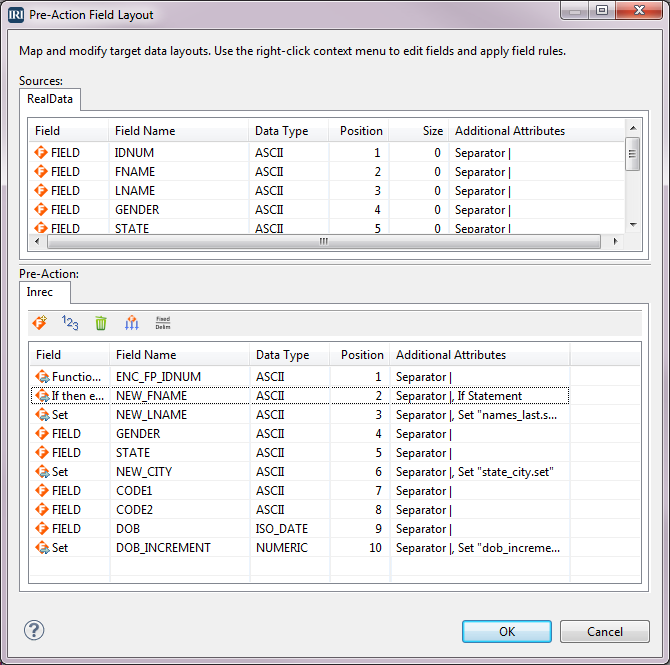
- Select Edit Pre-Action Layout to open the Pre-Action Field Layout mapping window. Initially, all the fields from the source RealData are copied to the Pre-Action (Inrec) section.
Define the New INREC Fields
All the fields below are created in the Pre-Action Field Layout mapping window. Each field will be derived using a different technique so fake data can replace real data according to our objectives above.
ENC_FP_IDNUM
Encrypt the IDNUM field
- Right-click on the field IDNUM -> Apply Rule -> Create Rule. This takes you to the window New Field Rule Wizard Selection.
- Click Encryption or Decryption Functions. Be sure the library location has our project name.
- The field Rule name will have the name EncryptionRule. Change this name to something more descriptive (EncryptionRuleIDNUM)
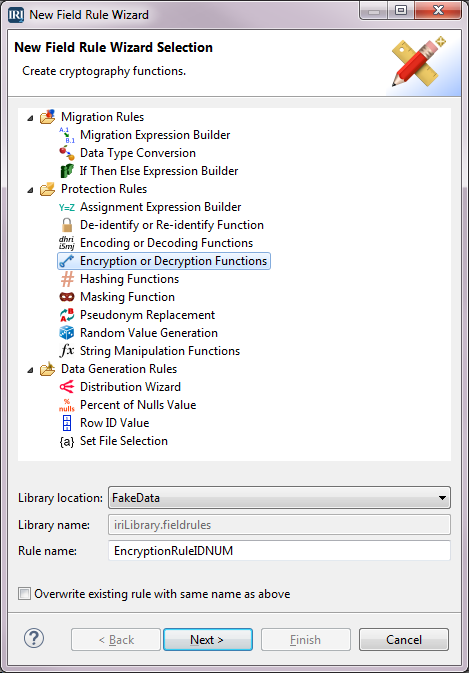
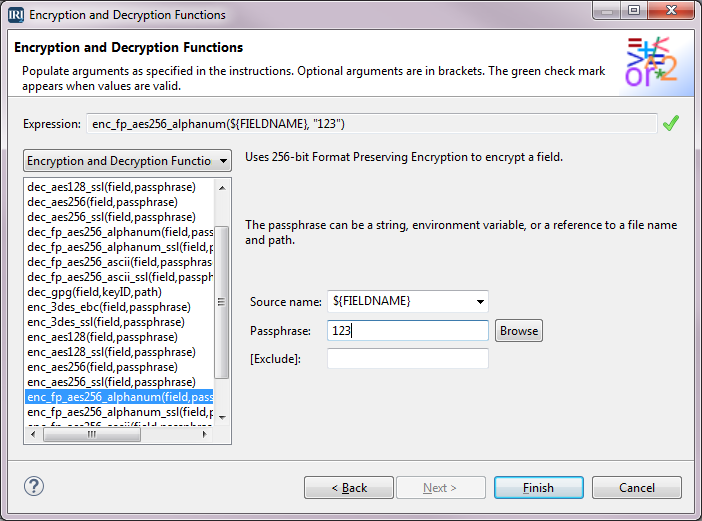
- Click Next to go to the Encryption and Decryption Functions window.
- Select enc_fp_aes256_alphanum. Any encryption function that has an fp in the name is a format preserving encryption function.
- Type in a Passphrase. This is used for the encryption key. I used 123, but you can use any value and a variety of encryption key management techniques.
- Click Finish.
It is possible to re-use saved rules in this or other projects.
NEW_FNAME
Conditional Selection of a Set File
This field is created in the INREC phase to replace the original first name value with a value in one of two IRI-provided set files with gender-specific first names.
- Right-click on the field FNAME. This opens the Pre-Action Field window.
- Change Field Name to NEW_FNAME.
- Select the Value tab.
- For the field Transformation Type, select If Then Else from the dropdown. This is selected because our job will be conditionally selecting the set file from which the values are drawn.
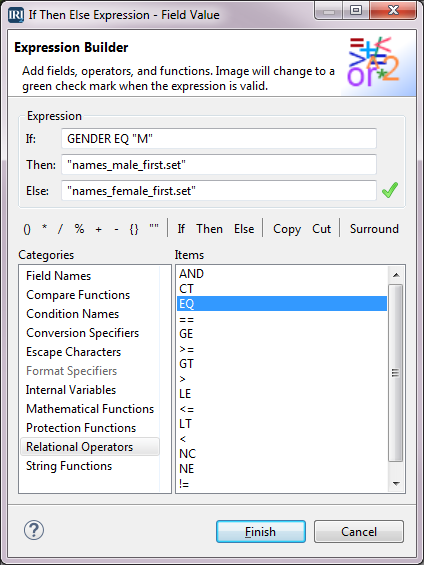
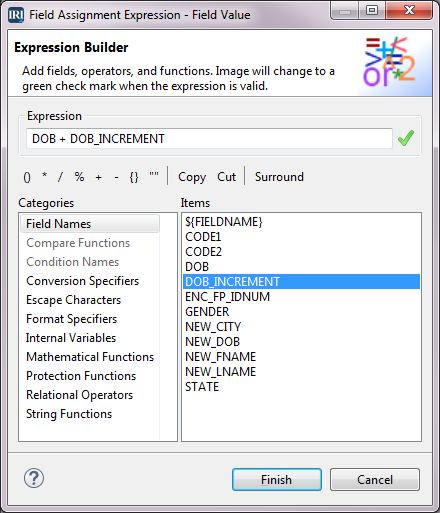
- Next to the Value field, click f … so we can define the condition logic in the Expression Builder.
- In the Categories box of the Expression Builder, select Field Names.
- Double-click on the field GENDER in the Items box.
- In Categories, click Relational Operators, double-click EQ.
- Click the quotes (“”) located below the Else field, then type an M between them.
- Place the cursor in the Then field and type SET=”names_male_first.set“.
- Place the cursor in the Else field and type SET=”names_female_first.set“
- Notice the green check which indicates a valid expression has been created.
- Click Finish.
The IF-THEN-ELSE logic will appear in the Value field of the Pre-Action Field window. Click OK to return to the Pre-Action Field Layout Window.
NEW_LNAME
Random Value Replacement from a Set File
This field is created in the INREC phase to replace the original last name value with values in an IRI-provided file called names_last.set.
- In the mapping dialog, right-click on the field LNAME-> Edit. This opens the Pre-Action Field window.
- Change the Field Name to NEW_LNAME.
- Select the Value tab.
- For the field Transformation Type, select Set:File from the dropdown.
- For File, you can type in the name for the set file (names_last.set) or click the Define button to browse to it.
- Click OK.
NEW_CITY
Select a Value from a Valid-Pair Set File
- Right-click on the field CITY –> Edit. This opens the Pre-Action Field window.
- Change Field Name to NEW_CITY.
- Select the Value tab.
- For the field Transformation Type, select Set: File from the dropdown.
- For File, type the name for the set file (state_city.set) or click Define to browse to it.
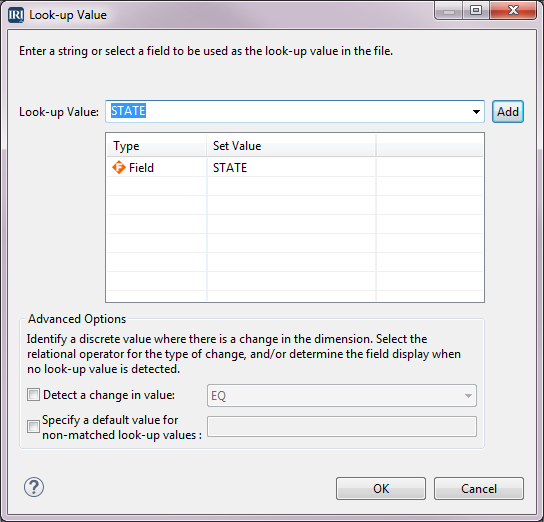
- Click on Look-up Value.
- In the Look-up Value dialog, select the field STATE from the dropdown for Look-up Value
- Click ADD.
- Click OK, then OK again.
DOB_INCREMENT
Select a Value from a Numeric Range for Date Arithmetic
- Right-click on field DOB > Insert below -> Field. This opens the Pre-Action Field window.
- For Field Name, type in DOB_INCREMENT.
- Select NUMERIC from the dropdown for Data Type, then make sure the Precision is zero (0).
- Select the Value tab.
- For the field Transformation Type, select Set: File from the dropdown.
- For File, type the name for the set file (dob_increment.set) or click Define to browse to it.
- Click OK.
We have now defined all the fields we need in the INREC section of the job. Click on the 123 icon to renumber the positions for the fields, then click OK and Next. This takes you to the Sort dialog.
Define the Sort
The box on the left lists our Inrec fields. The box on the right is where sort key fields are listed. To sort on the encrypted IDNUM field:
- Click on ENC_FP_IDNUM
- Select Add Key from the buttons in the middle. That field is then copied to the Key Fields box.
- Click Next to go to the Data Targets dialog.
Define the Target
- Click Add Data Target. Type in FakeData.dat for File.
- Click OK to return to the Data Targets window
- Click Target Field Layout
- All the fields from Inrec are copied automatically into FakeData.dat, but we need to remove the computational field DOB_INCREMENT because it should not display. Right-click on the field DOB_INCREMENT -> Remove
We do however, need to create a new field, called NEW_DOB, to reflect a DOB incremented by the dob_increment value:
- Right click on the field DOB –> Edit
- Type NEW_DOB for Field Name
- Select ISO_DATE from the Data Type menu
- Select the Value tab
- Select Expression from the Transformation Type menu
- Select the f … button to open the Expression Builder
- In the Expression Builder’s Categories box, select Field Names
- Double-click on the field DOB
- Click on the plus sign (+)
- Double-click on the field DOB_INCREMENT
- Click Finish, OK, OK, and then Finish.
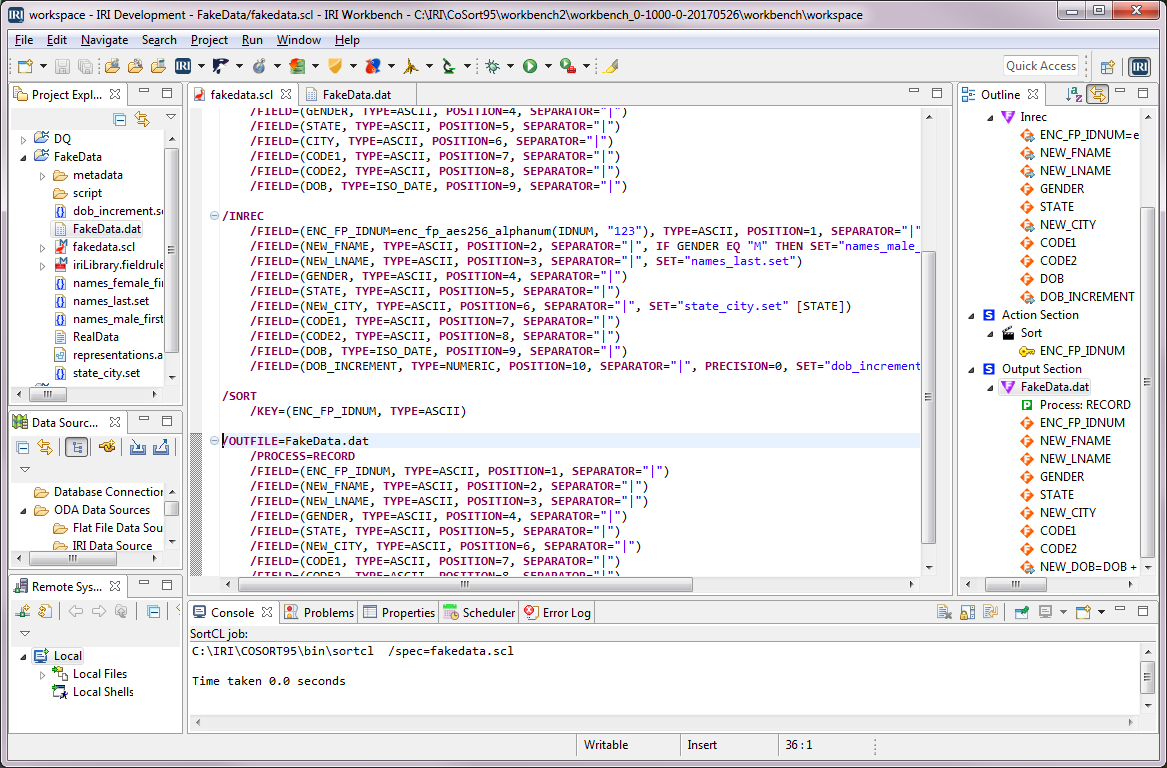
The script we built now appears in the IRI Workbench syntax-aware editing window. There are several ways to modify it:
- Right-click in the script editing window to bring up a menu of section-specific dialogs
- Right-click on an element in the outline view to bring up the section- or element-specific dialog
- Edit the script directly if you know the scripting language
- Work from workflow and transform mapping diagrams generated from this script, particularly if you are working in an ETL environment.
Here is my job script:
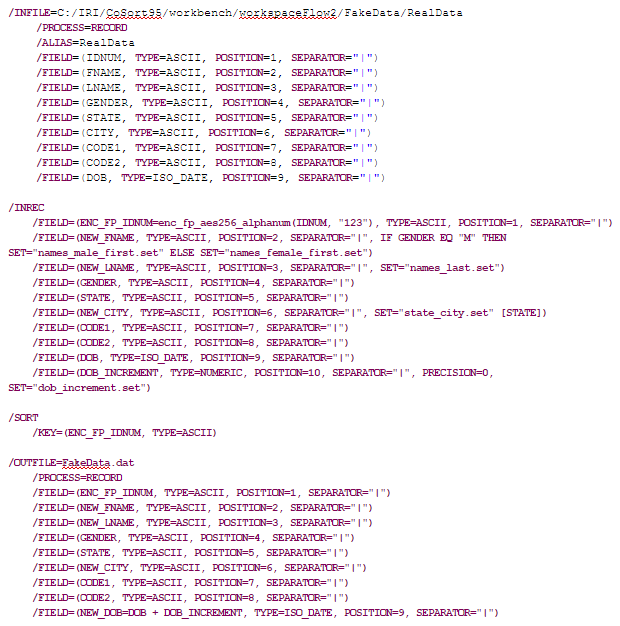
There are multiple ways to run this script from IRI Workbench. You can also copy it to any Windows, Linux, or Unix server where the CoSort (SortCL) executable is licensed, and run it directly there.
Right-click in the body of the script -> Run as -> IRI job.
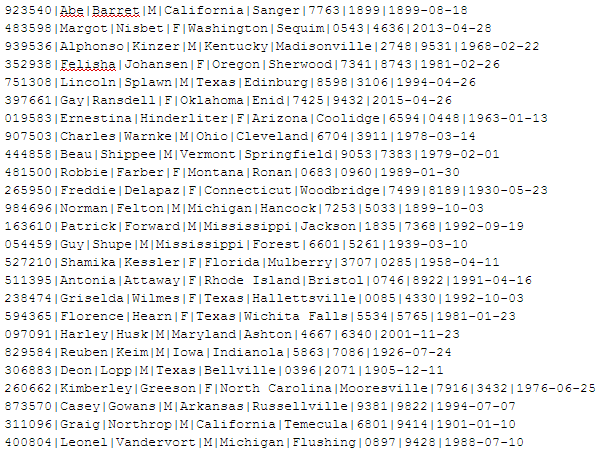
Here is the fake data my script produced:
Contact voracity@iri.com for help using the IRI Workbench GUI for Voracity for these things, and more:
- Encoding a value with format-preserving encryption
- Using values in set files for:
- direct replacement
- conditional set selection for replacement
- lookup
- Performing arithmetic to change a value
- See our series on test data planning and management considerations here.
- CoSort or Voracity users license SortCL for back-end use on any Linux, Unix or Windows platform.




1 COMMENT
[…] Zufallsgenerierung/-auswahl) via RowGen oder Voracity4. Eine Kombination der obigen Techniken in VoracityOder nutzen Sie unseren Service, schicken Sie uns einfach die DDL […]