Masking PII in MongoDB, Cassandra, and Elasticsearch with DarkShield:…
Editor’s Note:
As of 2024 and DarkShield V5, the search and masking methods for these NoSQL DBs has been upgraded; please refer to the discussion and demonstration in this updated article instead!
This article demonstrates the use of IRI DarkShield to identify and remediate (mask) personally identifiable information (PII) and other sensitive data in MongoDB, Cassandra, and Elasticsearch databases. Although these steps mainly focus on finding and shielding data in MongoDB collections, the same steps can be used for data in Cassandra tables as well. See this article on Elasticsearch, too.
Note that this article represents the fouth method IRI supports for masking data in MongoDB, and the second method for Cassandra. Those previous and still supported methods rely on structured data discovery and de-identification via IRI FieldShield, while the DarkShield method supports textual data in either structured or unstructured collections.1 Though DarkShield and FieldShield are standalone IRI data masking products, both are included in the IRI Voracity data management platform.
The latest approach uses some elements of Data Classification, an integrated data cataloging paradigm for defining the search methods used for finding PII independently from the source of the data. While this article provides a small introduction to Data Classification during Step 1, you may find it useful to read up on how Data Classification fits into our unified approach to conducting searches. For more information on Data Classification in the IRI Workbench front end for DarkShield et al2, please read this article before proceeding.
The identification and remediation of PII using IRI DarkShield involves 4 general steps:
(Optional) Step – Register Your Data Source(s)
In this (optional) step, data sources for a Mongo database, Cassandra keyspace, or Elasticsearch cluster are registered. This allows data sources to be reusable. As a result, this step is optional if the desired data source already exists in the registry, or if you plan on defining them from the wizard.
Step 1 – Specify Search Parameters
Here all aspects of a search are chosen. First, a source and target collection/table are set up based on the data connection specified in the registry or created in the wizard. Then, you can specify the search and remediation criteria for your data using Search Matchers the kinds of information to look for and how that information should be remediated. The result of this step is a .search file.
Step 2 – Conduct a Search
A search can be run from a .search file. The result is a .darkdata file annotating any identified PII.
Step 3 – Remediation (Masking)
Remediation can be done from a .darkdata file. Any identified PII will be remediated in the manner specified during search creation.
(Optional) Step – Register Your Data Sources
As a prerequisite step, you will need to register the connections to your online data sources (and targets) in the URL Connection Registry, which is located in the Preferences > IRI > URL Connection Registry dialog in IRI Workbench.
All URL Connections, including URI connection strings for MongoDB, Cassandra, and Elasticsearch can be saved. This allows for the URLs, authentication credentials, and any additional parameters to be saved and stored by IRI Workbench for future use.3
Step 1 – Specify Search Parameters (Create .Search File)
In the IRI Workbench IDE for DarkShield, Select New Database Discovery Job from the DarkShield Menu. Select a project folder and enter a name for the job:
Specifying a Source and Target
Any Mongo, Cassandra or ElasticsearchURLs that were previously created and saved in the registry can be accessed from the URI dropdown for both the Source and Target selectors. The name of the corresponding MongoDB collection, Cassandra table, or Elasticsearch index will also have to be entered:
A new URI can also be created by pressing the New button. This will open the URL Connection Details dialog. Enter a name for the connection, select the desired scheme, enter the host, and enter the database. If no port is present the default port for the scheme will be assumed.
A username and password can also be supplied if the database requires authorization. Any new URL connections will be saved in the URL Connection Registry, and can be re-used as a target.
After a source is specified, you can continue to the next page to select or create a target URI. The scheme of the target URI will be limited to the selected source URI, so a MongoDB source can only be sent to another MongoDB target, and similarly for Cassandra or Elasticsearch.
When a masking job is run, all rows in the source will be appended to the target, and any rows with matching keys will be overwritten. For Cassandra, ensure that the target table schema is compatible with data from the source table.
Adding Search Matchers
After both a source and target are specified, you can go to the next page to add search matchers.4 Select a library location containing any Patterns or Rules libraries which you wish to use and click Add to add a new Search Matcher.
KeyNameMatcher
The first Search Matcher that we will create will be used to match the entire value corresponding to any “name” key located in arbitrarily nested json structures and apply a Format Preserving Encryption algorithm to mask it. We can achieve this by creating a JSON path filter “$..name”. More information about JSON paths can be found here.
Since MongoDB collections, Cassandra tables, and Elasticsearch indexes are parsed by DarkShield as json documents, the filter can be applied to both in order to mask any value corresponding to any “name” key.
To match on the contents of the filtered data, we need to create a new Data Class. A Data Class represents PII and the associated matchers used to identify it. These matchers can include any combination of:
- Regular Expression Patterns
- Set file dictionary lookups
- Named Entity Recognition Models
- Bounding Box Matchers (images only)
- Facial Recognition (images only)
You can define Data Classes within the wizard or by opening the Data Classes and Groups page in the IRI Preferences. The Data Classes defined within the preferences can be used in both FieldShield and DarkShield for other data sources, including structured and unstructured data.
We can create an associated EVERYTHING Data Class for this matcher which will match on the entire contents of the value, since we are reasonably sure that all we will find in the values are names. You can use set file lookups containing a dictionary of names if you are unsure of the contents of your “name” keys or if you wish to mask only a subset of names.
For the Rule Name field of the KeyNameMatcher, we can select an existing Data Rule from the library location we have selected, or create a new rule that uses Format Preserving Encryption (FPE), for example:
To create an FPE rule, click Create next to the Rule Name field, select Encryption or Decryption Functions from the Data Rule Wizard that appears:
Specify an appropriate passphrase to serve as your encryption/decryption key, which can be an explicit string, environment variable, or the name of a secured file containing that string.
EmailsMatcher
After finishing the previous dialog and creating our new KeyNameMatcher, we can add another Search Matcher for email addresses. Simply click Add to create another Search Matcher to add to the list.
The IRI Workbench comes preloaded with an EMAIL Data Class which can be selected by clicking on Browse next to the Data Class Name field and selecting EMAIL from the dropdown menu.
For the Data Rule, you can select the FPE rule you have created for the previous Search Matcher by clicking on Browse next to the Rule Name field, or create a new one with one of the multiple masking functions available. I created a simple Data Redaction function which replaces the entire email with asterisks.
Your Search Matcher can now be added to the list by clicking on OK.
NamesMatcher
Our last Search Matcher will be used to find names within free-flowing text. For this, we will use Named Entity Recognition (NER) to find names using the sentence’s context. To begin, we need to click Add to create a new Search Matcher, and create a new Data Class called NAMES_NER:
To create a NAMES_NER Data Class, we first need to download the Person Name Finder model, en-ner-person.bin, from the OpenNLP sourceforge repository. Then, click Add to add a new matcher, select NER Model from the dropdown. Click Browse and navigate to the location of the downloaded model; for example:
After you have created the new Data Class, click OK and select the FPE Data Rule you defined previously to finish creating the Search Matcher:
Note that our NamesMatcher and KeyNameMatcher may have overlapping matches. If this happens, DarkShield selects the longest available match and removes any other overlapping matches. That way, you do not have to worry about DarkShield applying a masking function on already masked values.
Once you have added all the desired matchers, click finish to generate a .search file.
The generated .search file can be inspected to show the details about a search. This includes the source and target URIs, and information about all the matchers.
Step 2 – Conduct a Search (Create a .Darkdata File)
Completing the Dark Data Discovery Job wizard generates a new .search configuration file. That file contains the options we selected, including the source and target of our data, and the Search Matchers that will be used to tag PII for discovery, delivery, deletion, and/or de-identification.
To begin the search, right click on the .search file, select Run As, and choose either IRI Search Job or IRI Search and Remediate Job.
Search will only conduct a search, while Search and Remediate will also attempt to mask (or delete) any identified data. Both will generate a .darkdata file identifying any data of interest.
The source I used was populated with randomly generated values, so there is no harm in sharing the generated .darkdata file here. However, when handling actually sensitive information, users should assure the .darkdata file is not exposed and is safely archived or deleted after the completion of the remediation to prevent PII leakage. IRI will add a quarantine option for storing the .darkdata file and corresponding search artifacts in a safe location; contact darkshield@iri.com for details on this planned feature.
Step 3 – Remediation (Masking)
Again, data masking or deletion can be performed during Search operations via the Search and Remediate option in the Dark Data Discovery wizard. However, if you wish just to examine identified information and remediate it later, run the masking jobs from the .darkdata file produced in the Search (Step 2) this way:
Right click on the .darkdata file, mouse over Run As, and click IRI Remediate Job. Once the job runs, the remediated data should appear in the target database.
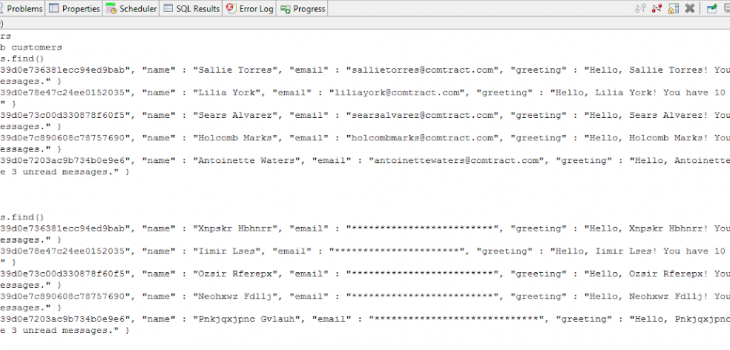
Here is an example showing a before and after of a small MongoDB database collection using the Workbench command prompt to access the local Mongo server:
CONCLUSION
In this article we demonstrated new IRI capability to access unstructured data in Mongo databases, Cassandra keyspaces, and Elasticsearch Clusters using several Search Matchers in IRI DarkShield. You can check the generated .darkdata model to see the search results that were found and remediated, and check your database to see the updated tables/collections.
- If PII is embedded in binary objects within your MongoDB, Cassandra, Elasticsearch collections, we can help automate their extraction to standalone files for DarkShield search/mask operations, and their reimport.
- The IRI Workbench IDE, built on Eclipse™, front-ends all FieldShield, DarkShield, and related data masking — and broader data handling capabilities — in the IRI Voracity platform.
- The URL Connection Registry is used to configure and save URL-based data sources used in DarkShield search/mask and CoSort/SortCL (Voracity) ETL operations; e.g., HDFS, Kafka, S3 buckets, MongoDB, S/FTP. This registry is similar, but not identical, to the Data Connection registry in IRI Workbench for relational databases sources where ODBC DSNs are bridged to corresponding JDBC connection profiles for the benefit of job wizards leveraging both connections.
- A Search Matcher is an association between a Data Class, which is used to define the search method for finding and classifying PII, and a Data Rule which will be applied to any instance of the Data Class found in the collection or table. Additionally, Search Matchers allow you to define filters which can be used to reduce the scope of the search. This is particularly useful in Mongo collections, Cassandra tables, and Elasticsearch indexes because the key name can be indicative of the PII which is stored in the corresponding value.


1 COMMENT
[…] MongoDB and Cassandra NoSQL DB collections […]