The Basic FieldShield Masking Job Wizard
The “New Masking Job…” wizard in the IRI Workbench GUI for FieldShield creates a single IRI FieldShield job (.fcl) script for masking data usually for just one source – like a flat file or table – where data classes and masking rules for multi-target consistency are not required.
Thus unlike the other FieldShield data masking job wizards which leverage a Data Class Map built from a multi-table or multi-file PII search operation, this wizard does not support data classes. Rather, it just looks at the input columns (or fields) in a single table (or file), and requires you to manually assign data masking functions to the target fields in one or more specified output files (or tables). .
You can still preserve referential integrity using this wizard by using masking functions that are deterministic in nature – like format-preserving encryption, hashing, or two-column pseudonymization – to produce consistent values in the output. This means each unique original value in the source will have the same unique replacement value in every target.
Running the “New Masking Job …” Wizard
To start the wizard, click on the FieldShield icon in the top toolbar menu of IRI Workbench and select New Masking Job …

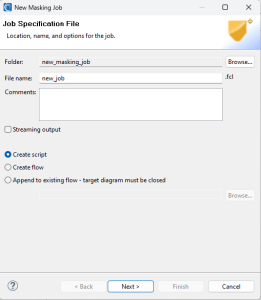
On the first page, Job Specification File, declare the folder and file name for your FieldShield masking job (script), and consider the other options available here, e.g.,
Select how you want the job specs serialized:
- Create Script: Generates the FieldShield job script necessary for masking the PII
- Create Flow: Generates a diagram to visualize the masking job workflow and mapping. To later create a script from a flow, right click on the task block in a flow diagram. Click IRI Diagram Actions -> Export Flow Component and in the dialog that opens, name the job script and click Finish to build it.
- Append to existing flow: Appends any new tables (or updates rules on tables already) being masked in this job to an existing flow diagram; i.e., a workflow diagram created in a prior job on the same schema.
In this example, Create Script is selected, since we intend to review and run the masking job. Click Next > to move onto the next page of the wizard.
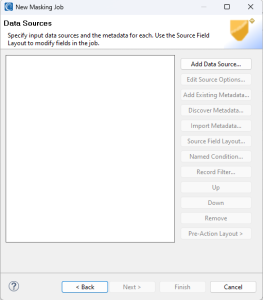
The next page is the Data Sources Page, which allows you to specify one or more flat file or RDB table sources. To begin, click “Add Data Source…”.
A new window will appear for you to select your silo type, source name, and (file) format. In this example, we will mask an existing delimited file, browsing our PC or LAN to specify it by path:
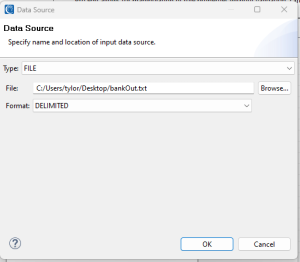
If you’re defining the data source for the first time, you will see an error message at the top indicating the job script needs the data definition format (DDF) metadata for its field layout. To create it, click ‘Discover Metadata…‘ and see this article for more information.
In the ”Discover Metadata” wizard page proceed by selecting ‘Next.’ You might then be prompted with a window asking if you want to detect the field layout.
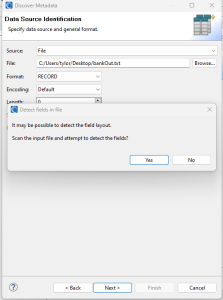
After selecting ‘Yes,’ ensure that the separator and frame (or any other relevant information) are correctly set, then click ‘OK.’ On the next page, double-check all settings to ensure accuracy. The data source page contains information about the source of the data, and any other detected information.
Once you are satisfied, click ‘Finish.’ A new window will then appear, asking if you want to copy the fields from the DDF. Choose ‘Yes’ to proceed.
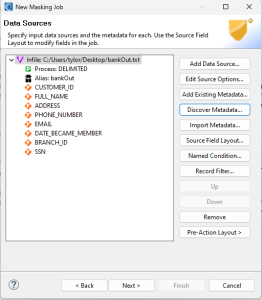
Note that if you want to specify additional data sources in this phase, you must follow the same steps so their fields are also defined.
Next, we’ll navigate to the Data Targets page, which resembles the source page and enables us to choose a target. Click on the ‘Add Data Target…’ button. Then, provide a name for your file or table, set the format accordingly, and click ‘OK’ to proceed.
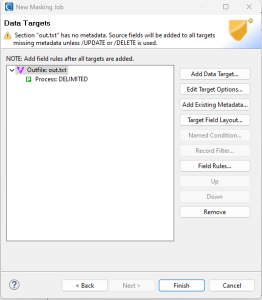
Notice again, that you have the ability to specify additional target tables or files based on the data from your source table/s or file/s. Note that the target’s field layout will be created from the source unless you specify or discover another layout.
Since we are doing a masking job, we will now add any rules to the fields. Select “Target Field Layout…”. A new window will appear and there are many different options we can choose from, but for this example, we will be attaching a few masking rules to their respective fields.
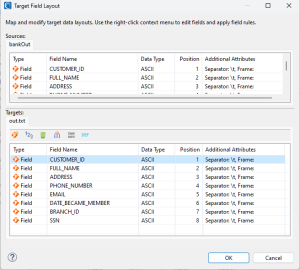
(Target Field Layout before adding rules)
To add masking rules to the output (target) fields, right-click on the field to modify and select ‘Apply Rule -> Browse Rule.’ From there, choose the desired rule. If you don’t have any rules yet, you can select ‘Apply Rule -> Create Rule’.
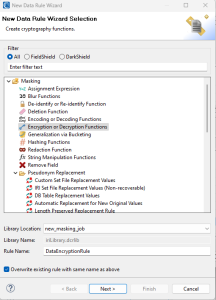
We will be creating a Format Preserving Encryption rule to use with our SSN column. Navigate to the “Encryption or Decryption Function”, and after selecting it, click Next.
From here we are greeted with many options, but we will select the enc_fp_aes256_alphanum. For this simple example, we will leave everything as default and select finish.
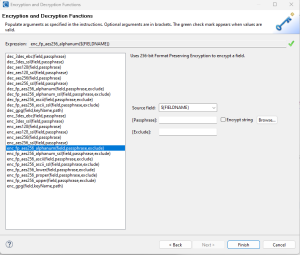
If you would like more information regarding Masking Rules, refer to this article.
Moving back into our FieldShield job we are applying a Format Preserving Encryption to the SSN column and a Pseudonymization replacement to the full name. This mirrors real-world scenarios, ensuring that sensitive data like SSN and full names remain realistic even after masking.
Once you’ve added the rules to the fields, click ‘OK’ and then ‘Finish’ to proceed.”
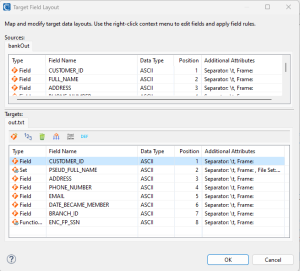
(Target Field Layout after adding rules in FULL_NAME and SSN)
Note: If you have more than one outfile, you must apply each rule manually to each field in each outfile. Use that rule consistently on like fields to preserve referential integrity among your targets.
A new file will be created with the extension .fcl, which is located in the folder specified within the first wizard page.
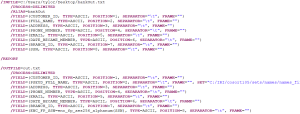
Next, right-click on the .fcl file and select ‘Run as -> IRI Job.’ This will execute the SortCL scripts and complete the masking job.
Now, you can compare the original file with the masked file. You’ll notice that while the data remains realistic, the full name and SSN have been masked. We’ve highlighted them for your convenience.

(Original File)

(Masked File)
Follow along with our YouTube video here: https://youtu.be/EplTQabutak
Please email fieldshield@iri.com if you have any questions or need help with any aspect of this or any other FieldShield data discovery or masking wizard.


