Connecting to Snowflake for Data Integration & Security
Connecting to and working with data in cloud data warehouse powered by an AWS Snowflake database from the IRI Workbench IDE is no different than with an on-premise SQL-compatible source. You browse Snowflake tables and exchange metadata in Workbench via JDBC. And, you move data to and from the CoSort SortCL big data management tool (that IRI Voracity and subset IRI products in Workbench use) via ODBC. Note that if you are using DarkShield, only the JDBC connection is required.
Where you run IRI Workbench and your licensed IRI product — on-premise or in the cloud — is up to you. We do however recommend running SortCL on the same node or subnet with Snowflake if tables volumes are large enough to make internet transfer time a consideration.
This article explains step-by-step how to: 1) reach Snowflake with these drivers to see your schema and use its metadata in IRI Workbench; and, 2) process the data in those tables in SortCL-compatible jobs (e.g. for Snowflake data transformation). Connections to Teradata, SAP HANA, EnterpriseDB (PostgreSQL), and any other source with ODBC and JDBC drivers are made similarly.
Step 1: Get Info & Drivers from Snowflake
Take note of the URL, User Name and Password needed to access Snowflake, and the name of the warehouse and database that you will use. Your driver configurations will need those details.


Download the Snowflake ODBC driver per these steps, and the JDBC driver per these. I used the 32-bit Windows driver for compatibility with my CoSort v10 SortCL executable, and snowflake-jdbc-3.6.10.jar.
Step 2: Configure the ODBC Driver in Your O/S
If you are running a Windows instance as I am, and as you can see from Snowflake’s instructions here, you will also need the free MS Visual C++ runtime:

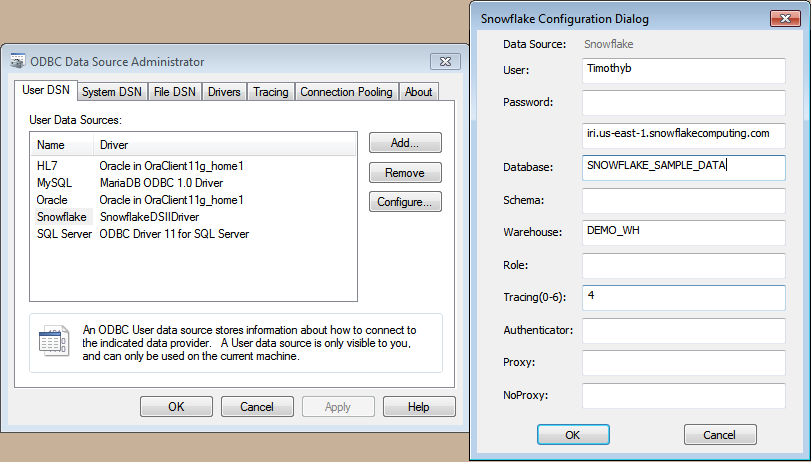
Run the appropriate ODBC installer from Snowflake, and then configure the driver in your ODBC Data Source Administrator. If you are running a 32-bit version of SortCL as I am here, you will need to use C:\Windows\SysWOW64\odbcad32.exe.
Add the SnowflakeDISIIDriver to your User (or System) DSN. In the Snowflake Configuration Dialog, enter your login and DB/DW details like these, including the password:
After clicking OK, you will be able to reference this DSN to reference in the IRI Workbench Data Connection Registry. But first …
Step 3: Configure the JDBC Driver in IRI Workbench
Though you do not have to do this first, I like to create and work from an active Project to store my jobs and metadata artifacts that will come from my connections. I created a folder in my Workspace Project Explorer called Snowflake.

Now, to use the Snowflake JDBC driver connect to my database in the Data Source Explorer, first click on the New Connection Profile icon, and then select Generic JDBC driver:

Click Next, and from the properties dialog click on New Driver Definition:

That brings up a series of tabs to populate:

Click on the JAR List tab, Add JAR/Zip … and browse to use the downloaded Snowflake .jar file:

Next, in the Properties tab, specify the Connection URL, Database Name and User ID. The Driver Class parses out of the .jar file by clicking on the button appearing at the right of the field when clicking in the Driver Class field, then clicking Browse. Use the option starting with net.

Once those details are in place click OK. The main properties screen is displayed. Re-enter your password and click Save password to avoid being prompted when using WB. Click the Optional tab and specify the name of the warehouse by typing in “warehouse=<name>”. Once done, click Test Connection and Finish.

Once connected to the Snowflake Data Warehouse, you should be able to expand and access your available database catalogs in the Data Source Explorer view of IRI Workbench:

You can also right-click on, and rename ‘New Generic JDBC’ in the connection list to something more descriptive, like ‘Snowflake.’

Step 4: Register & Bridge Your Connections
Open the Data Connection Registry from the IRI Workbench Window > Preferences > IRI group.
If the DSN we created for Snowflake above is not shown in the list, click the Refresh button. When you see it, double click on this entry, or click Edit …, to open its connection dialog:

Add a schema filter if desired. Since the ODBC driver does not save the password, enter it in the Authentication section. Select the connection profile for the JDBC connection:
By registering this connection, you are mapping the permissions between the IRI executables that move and manipulate Snowflake data through ODBC, and IRI Workbench wizards that use your JDBC connection to parse and use the table metadata. This is what allows IRI Workbench to create and visually interact with your data layouts and column-level job specifications.
Step 5: Test Things Out
After this, everything should be configured, and you can verify both by opening the database and table you want in Data Source Explorer (which uses JDBC). Right click on a table in your schema, and choose Generate DDF from the IRI menu to reveal:

For help connecting your Snowflake instance in IRI Workbench, or developing your cloud ETL solutions with the big data management tools in the Voracity platform, contact your IRI representative.





1 COMMENT
[…] Finding and masking personally identifiable information (PII) in Snowflake® data warehouses works the same way in IRI FieldShield® or Voracity® installations as it does for other relational database sources. This article shows how I masked some of the columns in an online table after connecting my Snowflake warehouse in AWS to IRI Workbench. […]