Connecting MS SQL to IRI Workbench
Whether your SQL Server database is on-premise or in a cloud enviroment like Azure, its data is accessible for movement and manipulation in IRI Workbench-supported products like CoSort, FieldShield, DarkShield, NextForm and RowGen, or the IRI Voracity platform which includes them all. Note that if you are using DarkShield, only the JDBC connection described below is required.
SQL Server integration follows the same paradigm as other relational databases. This means driver downloading and installation, configuration (using and testing with your credentials), registration, and validation. You will need to connect both ODBC for data movement between SQL Server and the IRI run-time engine, and JDBC for table browsing plus metadata interchange in IRI Workbench.
Note that if you use DarkShield to search and mask data in MS SQL per this article, usually because there is unstructured data inside, you will only need to connect via JDBC.
ODBC
Start with the 32-bit ODBC administrator to configure what should already be available in your Windows OS; i.e., Start > ODBC Data Sources (32-bit). Add …
And complete the prompts until successful; e.g.,
JDBC
Locate the JDBC driver for your version (or see below), and then open IRI Workbench. Turn your attention to the Data Source Explorer view. Click on ![]() there to open:
there to open:
Select SQL Server and click Next >
The next step is to click on the icon immediately to the right of the driver drop-down box. If you hover the mouse over the button, the tooltip “New Driver Definition” will appear.
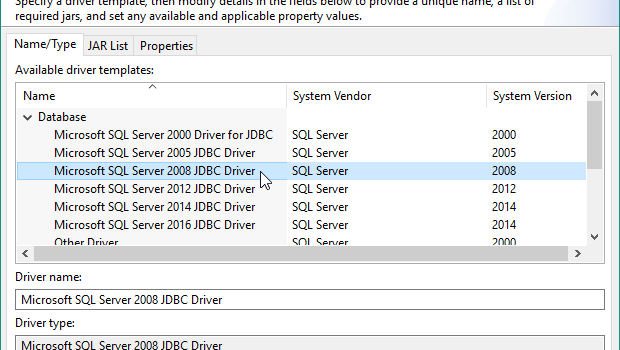
This will start the process of defining the new driver. On the screen that follows, select the appropriate driver template. SQL Server 2019 is supported, even if it does not appear on the list (shown below); you can pick 2016 or 2008 so long as the driver you define in the subsequent step supports it.
Now click on the “JAR List” tab. Highlight the existing jar file, then click “Edit JAR/Zip…” button on the right. Browse to the location of your Microsoft SQL Server JDBC driver files, and select the jar file.
If you cannot connect with the default driver, or want to use a different one (like the 32-bit JRE 8 JDBC v7.4 Driver, for MS SQL Server 2019 available from Microsoft here), remove the current JAR and Add the new one.
Only one driver should be listed. Click “OK” to finish the driver definition.
Next, complete the details needed to connect to your SQL Server instance, for example:
If you want to use integrated authentication instead of a separate username and password, then you will have to copy the auth\x64\sqljdbc_auth.dll file from the driver folder into your C:\WINDOWS\System32 folder first. Administrator privilege is required to copy this file.
Test the connection to make sure that it connects as expected. Save the password. If you use JDBC v11.2 or later and get a SQLServerException error because the driver could not establish a secure connection via SSL or find a valid certification path, you can bypass this using v9.4 here.
Workbench Registration
Once you have finished creating the Data Source Explorer connection profile, you must REGISTER it in preferences. Open Preferences from the “Window” menu. Navigate to and expand the IRI preferences in the left side tree.
Select the “Data Connection Registry” page. Double click on the entry for your ODBC DSN connection.
Enter your user name and password. At the bottom, select the DTP connection profile that you just made.
You should now be done with the database connectivity steps for SQL Server. If you need assistance, email support@iri.com.
Follow along with our YouTube video!
If you have more tables to deal with than you can or need to see at once, you can filter them in the Data Source Explorer (DSE) at the schema or table level this way. For more advanced table filtering, see this article. And if you need to connect to MS SQL via SSL, see this article.


