Creating a Voracity Flow Using Existing IRI Scripts (Part…
This is first in a series of articles explaining how to create and use Flows in the IRI Workbench GUI for Voracity. Flows contain ETL and other data processing steps, and are illustrated in flow and transform mapping diagrams in the GUI. They are saved in .flow files for use in the GUI, and can be serialized as .sh or .bat files for execution from within or outside the GUI.
The example below assumes that data transformation and/or reporting scripts in the SortCL language of IRI CoSort already exist. It also shows how to modify the flow as requirements for the job change. Subsequent articles will be a continuation of the flow started here.
The following scenario starts with a month-end job that consists of a CoSort SortCL script contained within a batch process. We now want to represent this job in a flow using simulated sales transactions.
Process Outline
We have a sales transaction table (TRANSACTIONS) in Oracle, where each entry is appended to the table as it occurs. The table contains records for purchases, returns, and account payments. These transaction records are extracted using a SortCL script. Then, they are sorted into three (3) separate target files. One for:
- credit transactions (CreditRecords.dat) – these include all 3 transaction types mentioned above
- cash transactions (CashRecords.dat)
- all transactions except for credit payments (AllSales.dat)
Here is the script (SortTransSelect.scl) that extracts records and maps the fields to these files. Notice the /QUERY that only allows selection of records from the table for the current month (December in this case) using an SQL statement.
/STATISTICS=sorttrans.stat
/INFILE=”NIGHTLY.TRANSACTIONS;DSN=Oracle_qa2;”
     /PROCESS=ODBC
     /ALIAS=NIGHTLY_TRANSACTIONS
     /QUERY=”SELECT * FROM NIGHTLY.TRANSACTIONS WHERE PURCHASE_DATE >= \’161201\’ AND
PURCHASE_DATE < \’170101\'”
     /FIELD=(TRANSTYPE, TYPE=ASCII, POSITION=1, SEPARATOR=”|”)
     /FIELD=(ACCTNUM, TYPE=ASCII, POSITION=2, SEPARATOR=”|”)
     /FIELD=(QUANTITY, TYPE=NUMERIC, POSITION=3, SEPARATOR=”|”, PRECISION=0)
     /FIELD=(DEPT, TYPE=ASCII, POSITION=4, SEPARATOR=”|”)
     /FIELD=(SKU, TYPE=ASCII, POSITION=5, SEPARATOR=”|”)
     /FIELD=(SKU_DESCRIPTION, TYPE=ASCII, POSITION=6, SEPARATOR=”|”)
     /FIELD=(PRICE, TYPE=NUMERIC, POSITION=7, SEPARATOR=”|”, PRECISION=2)
     /FIELD=(PURCHASE_DATE, TYPE=ASCII, POSITION=8, SEPARATOR=”|”)
     /FIELD=(TOTAL_PRICE, TYPE=NUMERIC, POSITION=9, SEPARATOR=”|”, PRECISION=2)

/SORT
     /KEY=(ACCTNUM, TYPE=ASCII)

/OUTFILE=CashRecords.dat
     /PROCESS=RECORD
     /INCLUDE WHERE ACCTNUM EQ “999999999999”
     /FIELD=(TRANSTYPE, TYPE=ASCII, POSITION=1, SEPARATOR=”|”)
     /FIELD=(ACCTNUM, TYPE=ASCII, POSITION=2, SEPARATOR=”|”)
     /FIELD=(QUANTITY, TYPE=NUMERIC, POSITION=3, SEPARATOR=”|”, PRECISION=0)
     /FIELD=(DEPT, TYPE=ASCII, POSITION=4, SEPARATOR=”|”)
     /FIELD=(SKU, TYPE=ASCII, POSITION=5, SEPARATOR=”|”)
     /FIELD=(SKU_DESCRIPTION, TYPE=ASCII, POSITION=6, SEPARATOR=”|”)
     /FIELD=(PRICE, TYPE=NUMERIC, POSITION=7, SEPARATOR=”|”, PRECISION=2)
     /FIELD=(PURCHASE_DATE, TYPE=ASCII, POSITION=8, SEPARATOR=”|”)
     /FIELD=(TOTAL_PRICE, TYPE=NUMERIC, POSITION=9, SEPARATOR=”|”, PRECISION=2)

/OUTFILE=CreditRecords.dat
     /PROCESS=RECORD
     /OMIT WHERE ACCTNUM EQ “999999999999”
     /FIELD=(TRANSTYPE, TYPE=ASCII, POSITION=1, SEPARATOR=”|”)
     /FIELD=(ACCTNUM, TYPE=ASCII, POSITION=2, SEPARATOR=”|”)
     /FIELD=(QUANTITY, TYPE=NUMERIC, POSITION=3, SEPARATOR=”|”, PRECISION=0)
     /FIELD=(DEPT, TYPE=ASCII, POSITION=4, SEPARATOR=”|”)
     /FIELD=(SKU, TYPE=ASCII, POSITION=5, SEPARATOR=”|”)
     /FIELD=(SKU_DESCRIPTION, TYPE=ASCII, POSITION=6, SEPARATOR=”|”)
     /FIELD=(PRICE=PRICE, TYPE=NUMERIC, POSITION=7, SEPARATOR=”|”, PRECISION=2)
     /FIELD=(PURCHASE_DATE, TYPE=ASCII, POSITION=8, SEPARATOR=”|”)
     /FIELD=(TOTAL_PRICE, TYPE=NUMERIC, POSITION=9, SEPARATOR=”|”, PRECISION=2)

/OUTFILE=AllSales.dat
     /PROCESS=RECORD
     /FIELD=(DEPT, TYPE=ASCII, POSITION=1, SEPARATOR=”|”)
     /FIELD=(YEARMONTH=sub_string(PURCHASE_DATE, 1, 4), TYPE=ASCII, POSITION=2, SEPARATOR=”|”)
     /FIELD=(TOTAL_PRICE, TYPE=NUMERIC, POSITION=3, SEPARATOR=”|”, PRECISION=2)
     /INCLUDE WHERE TRANSTYPE NE “0”
Before proceeding, a project needs to be created in IRI Workbench to hold all the files used in this job. I created the project MonthEnd.
Create a Flow
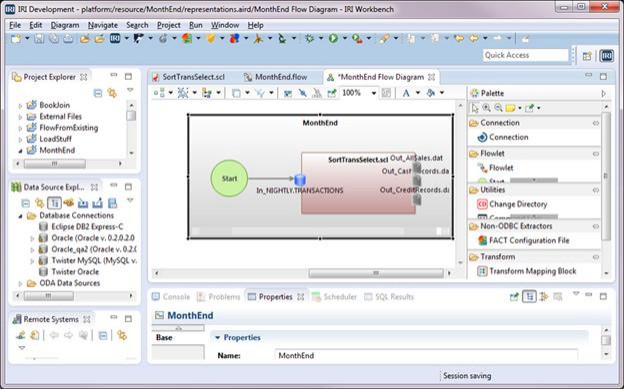
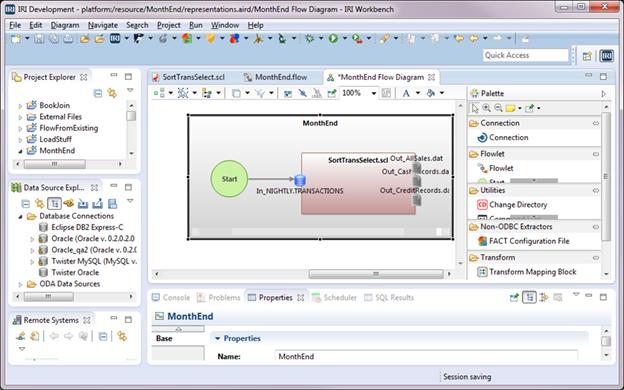
You can create a flow from an existing script by right-clicking the SortTransSelect.scl file in the Project Explorer and selecting IRI >Create Flow from Script. This creates a flow file named SortTransSelect.flow, adds the script to it, and opens a diagram in one step (after saying yes to displaying the diagram in the prompt). Click Save. Rename the file to MonthEnd.flow by right-clicking it in the Project Explorer and selecting Rename.
The flow diagram that displays, contains a green Start block connected to a brown Transform Mapping Block contained by a grey Flowlet block. A flowlet block and one start block are required for all flow jobs.
Make sure you have a Properties View open where you can edit more detailed information about the Flow file using the Base tab. Click on the flowlet block, change the name to MonthEnd in Properties, and click save on the navigation bar. The flowlet represents the job and since the job will be run on windows, will be used to create the batch file for the job.
In the Properties view, the transform mapping block has a property called Name and a property called IRI Job, both of which have the name of the script that is represented. The transform mapping block displays the inputs and outputs with the input using the icon for a database table and the outputs using the icon for a file.
Create a Transform Mapping Diagram
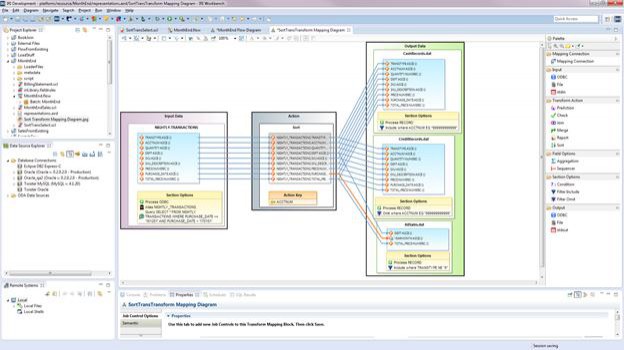
Double-click the transform mapping block to open a transform mapping diagram. Name the diagram SortTrans Transform Mapping Diagram and click OK.
A detailed diagram for the script now displays in the editor. I have moved and resized the blocks to better display those details.
Notice that there are three main blocks:
1. The purple block is for Input Data. Each data source is defined in a white block. There is a:
- yellow block for Section Options. This contains the definitions that apply to the whole file or table. This is where filters can be applied. You can double-click on any one of the options to bring up a screen to edit the option. To add an option, click in the block, and go to the Section Options tab under the Properties view.
- blue block with all the definitions of fields that are referenced for the file or table. You can double-click on any field to bring up the Field Editor to make changes to the definition of that field.
2. The dark gray block is for an Action. Within this block, the light gray block shows the fields that can be mapped to the target. The action can:
- Sort using the Keys in the Action Key block
- Report where no keys are used and records are copied from input to output
- Join records from 2 or more files or tables based on common fields
- Merge pre-sorted files using the Keys in the Action Key block
- Check using the Keys in the Action Key block to find the first record that is not in order.
3. The green block is for Output Data. Each target is defined in a white block. It also contains a:
- yellow block for Section Options and, as in the input, contains definitions that apply to the whole file or table, including filters that are only applied to the particular output. Here is where aggregation definitions are held, but separate layout attributes for the aggregation field will be in the blue block.
- blue block with the definitions of fields that are mapped from input to output. The fields that are connected with orange arrows are derived fields where masking, math or string
functions, ad hoc pseudonymization, and IF-THEN-ELSE selection or transform logic has been applied.
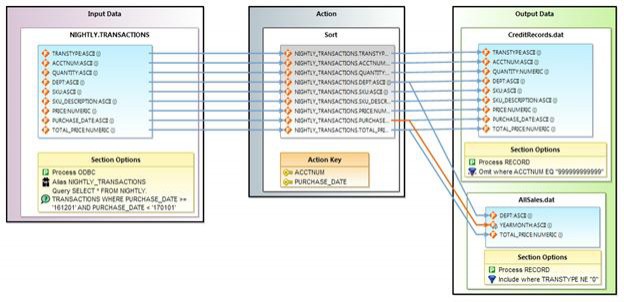
Each of the output files for our script has a filter in the Section Options. CashRecords.dat and AllSales.dat each have a Filter Include from the Palette, and CreditRecords.dat has a Filter Omit. Notice that the blue arrows show how the fields or columns map from the input, through the action, and then to the outputs. The outputs can receive all or some of the fields, and can have them in a different order than the input.
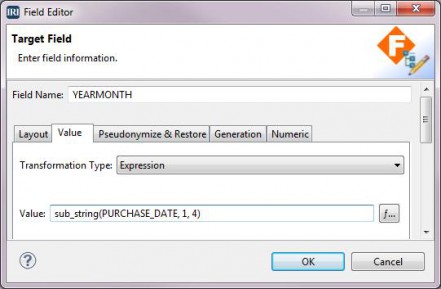
There is one field in the target shown with an orange arrow for the connection. This indicates that a function or transformation is being applied to the data in the field, so its target value is derived from the original field value. Double-click on the field with the orange arrow to bring up the Field Editor. This dialog shows that the sub_string function is applied to the field PURCHASE_DATE to get the value for the field YEARMONTH.
Deleting a Target
After studying the Transform Mapping Diagram, I decided to make a few changes to the job. There is no longer a need for the output file CashRecords.dat. To delete, either use the delete key on the keyboard or right-click in the white block for CashRecords.dat, then Edit > Delete from model.
Adding a Sort Key
Now we need to add a key to the sort. The PURCHASE_DATE needs to be sorted within each ACCTNUM. Double-click in the white Sort block to bring up the Sort dialog. This is where all edits to the keys must be done. Under Input Fields, click on the field PURCHASE_DATE > Add key. PURCHASE_DATE is added to the Key Fields column. Then click Finish. The new key is now displayed in the Action Key block. The following represents the script with our changes:
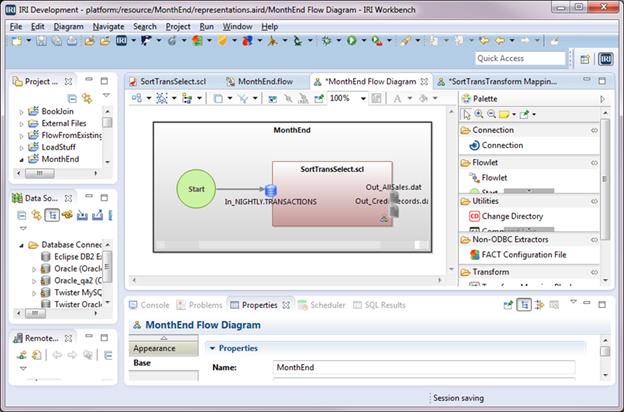
We can now go back to the MonthEnd Flow Diagram. Notice the icon for the file Out_CashRecords.dat has been removed.
Exporting the Flow
Right-click in the flowlet > IRI Diagram Actions > Export Flow Component. Here is where you select the operating system type and name the batch/shell script, in this case MonthEnd.bat because the batch script will be executed in Windows. Upon clicking Finish, a batch file is created and the script SortTransSelect.scl is updated. The script is named the same as the IRI Job field in the transform mapping block. If you want to keep the original job script then put a different name for the IRI Job field in the Properties view.
The file MonthEnd.bat can be used to execute this flow and consists of the following lines:
@echo off
sortcl /SPECIFICATION=SortTransSelect.scl
The batch flow, or individually executable job steps within it, can run from within Workbench directly, through its task scheduler, any third-party job scheduler, or from the command line.
Continue onto part 2 in this series with this next article, where we will add another task (job script) to the flow. For feedback or help with your use case, please email voracity@iri.com.
