SQL Server SSL Connection
Since SQL Server has changed the functionality and default behavior of their driver, this article will go over the basic ODBC and JDBC connections required for the IRI software backend (CoSort SortCL engine in Voracity) and job design front-end (IRI Workbench, respectively, to Microsoft SQL Server databases on-premise or in the cloud which use encrypted connections.
The article is broken down into three different configurations:
- Setting up the drivers using SSL.
- Bypassing the need for certificates for SSL connections.
- Disabling the driver encryption if the database is not using SSL.
This article is not a replacement for the previous article on setting up connections to SQL Server. This is due to the fact that older versions of SQL Server databases do not support the latest drivers, so the previous article is still relevant to those with older database versions.
Prerequisite: In order to set up both ODBC and JDBC for a Secure Sockets Layer (SSL) connection, an SSL certificate that is provided by the Database Administrator is needed.
There are two options when it comes to connecting IRI software to an SQL Server database with SSL enabled:
- Using the SSL certificate provided by the DBA.
- Bypassing the certificate. This is only recommended for test or development environments.
Using Certificates
This section details how to set up both ODBC and JDBC connections using the SSL certificate. To set up these connections, it is necessary to know what type of encryption is being used by the instance of the database server.
There are two options for encryption:
Force Encryption
- Clients must use mandatory as the encryption type
- TDS 7.xi protocol is used
- A certificate that is self-signed can be used
- The need for certificates using the parameter trustServerCertificate = true can be bypassed
Force Strict Encryption. This forces:
- all clients to use Strict as the encryption type
- the use of a certificate that isn’t self-signed
- the use of a driver that supports Tabular Data Stream 8.0 (TDS)
Trusted Root Certification Authorities
To use the certificate for SSL that was received from the DBA, that certificate needs to be added to the Trusted Root Certification Authorities.
Right-click on the windows icon, then select the option run.
When the Run window appears, in the Open text box, type certlm.msc.
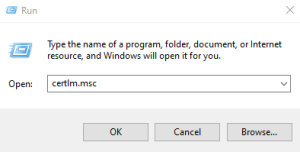
When the Microsoft Management Console appears: select Yes, then a new window will pop up that allows the management of certificates. Hit the twisty on Trusted Root Certification, then select the Certificates folder.

To add the new certificate to the Certificates folder, right-click on the Certificates folder -> hover over All Tasks, then select Import…
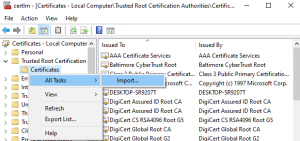
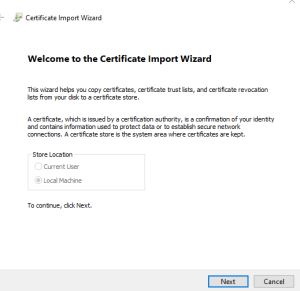
The Certificate Import Wizard will appear. Now select Next to start the process.
On the next page, provide the path to the certificate that needs to be imported.
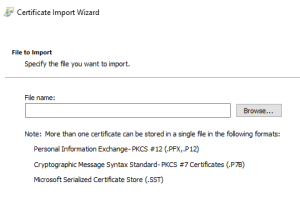
By default, the browse button will look for the X.509 Certificate in the file system. If you have a different type of certificate, use the drop-down menu to select your file type, or select All Files.

The next page defines where to import the certificate. The default is the Trusted Root Certification Authorities. To keep the default, select next.
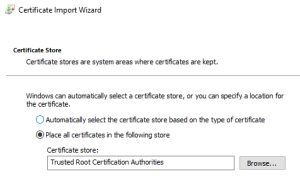
The next page provides an overview of what is being imported and where the certificate is placed. Select Finish, then verify that the certificate was imported into the Certificates folder. The Certificates will be shown in alphabetical order.
ODBC Setup
Download the SQL Server driver, then execute the installer. Once the installation is completed, go to the Windows search bar and type ODBC Data Source Administrator. There will be two versions, one for a 64-bit version and one for a 32-bit version. Select the version that corresponds to your SortCL version.
Once the version is selected, a wizard will pop up like the image below.
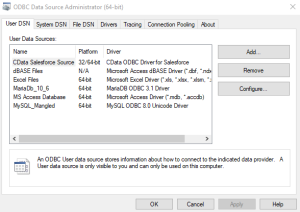
To create the ODBC connection, decide if the connection will be placed in the User DSN or in the System DSN. User DSN means all ODBC connections will only be available to the user who created the connections, while system DSN connections will be available to all users.
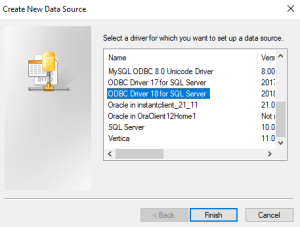
Select the Add… button to create a new connection -> Select the ODBC Driver “version” for SQL Server, then click Finish. The image below shows driver version 18 being selected for this example.
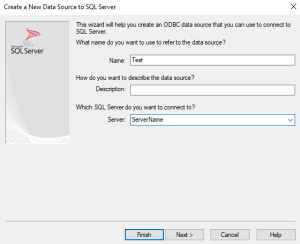
The Create a New Data Source to SQL Server page will appear. Name refers to the name of the connection. Type in a name that gives context to what the driver is connecting to.
The Server text box is required and gives the server connection. This can be either the IP address of the server or the server name. Select Next to move to the next page.
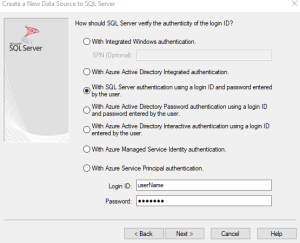
This page goes over how to authenticate the database. There are several different ways to authenticate, but describing these is outside the scope of this article. Login ID and password will be used in this example. Select Next.
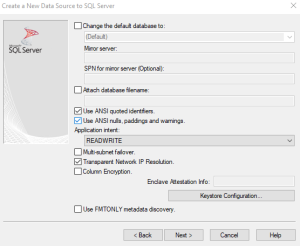
This page gives specific optional parameters for dealing with the database. For now, we will skip this page. Select Next to skip this page.
This next page deals with the encryption connections to the database. If the database is using Force encryption, set the Connection Encryption drop-down menu to Mandatory.
Further down the page, there is a Hostname in certificate (optional) text box. Enter the hostname that is being used in the certificate. If this field is left empty, the hostname of the pc that you are using will be added by default. This can cause an error since the PC hostname may not match the certificate hostname.
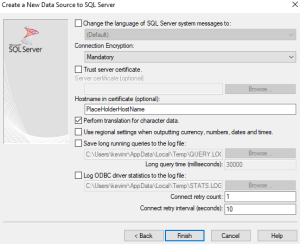
If Force Strict Encryption is the encryption type, set the Connection Encryption box to Strict instead of Mandatory. The Server certificate (optional) will allow you to point directly to the certificate that needs to be used.
If the certificate isn’t already in the Trusted Root Certification folder, use this option. Again the hostname option is enabled and it is recommended to fill this out.
Now that the encryption parameters are set, select Back to return to the previous page where the default database can be set.
For the driver to have access to all the databases that are associated with the server, the driver needs to be able to connect to the server to query that information. That is why this page needed to be skipped until the encryption settings were defined.
At the top of the page select Change the default database to and click the drop-down menu to select a database. The drop-down menu will take a second to load since a query has to be completed successfully.
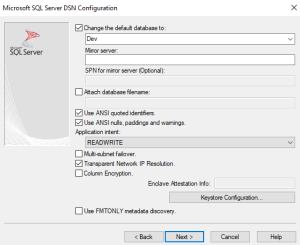
If a connection error occurs check the following information:
- Server information is correct (1st page).
- The authenticating procedure is correct (2nd page).
- The setting for the encryption corresponds to what the database server is expecting (4th page).
- The hostname provided is the hostname that is in the certificate (4th page).
- The certificate being used is the correct one for the database server
Once all the settings and parameters are set, click Next until you reach the last page. Select the Finish button. A new window will appear that will allow the connection to be tested.
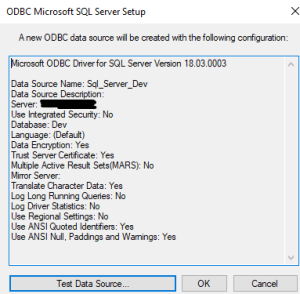
If everything is successful, then the ODBC driver is ready for use.
JDBC Setup
The JDBC driver will also use a certificate in order to connect to the database using SSL. There is a list of standards that a certificate needs to meet inorder for the JDBC driver to use it. Requirements are in the Validating server TLS certificate section in the link provided.
Download the JDBC jar file here.
The certificate needs to be imported into a trust store so that it can be used. There are different trust stores that the Trust Manager will use to find the certificate for the SSL.
The trust manager will look for the default trust store in the following search order:
- If the system property “javax.net.ssl.trustStore” is defined, the TrustManager tries to find the default trustStore file by using the filename specified by that system property.
- If the “javax.net.ssl.trustStore” system property isn’t specified, and the file “<java-home>/lib/security/jssecacerts” exists, then that file is used.
- If the file “<java-home>/lib/security/cacerts” exists, that file is used. (This one is the most likely.)
In this article, the cacerts (3rd option) trust store will be used. Cacerts is located at java_home/lib/security/cacerts. To find your java_home go to the Windows search bar and type environment variables.
The System Properties wizard will appear. At the very bottom of the Advanced tab, select Environment Variables…
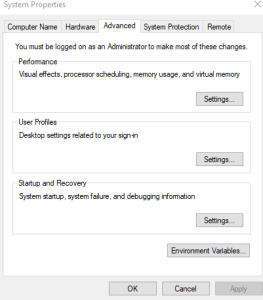
The Environment Variables page will appear. On the second half of the page, there is a section called System Variables. In this section, there should be a variable called JAVA_HOME with the full path to where java is installed.

Inside the java security folder, there will be the trust store cacerts file.

Now that cacerts has been found, open up the command line as Administrator to this directory.
At the command line, type the following Syntax to import the certificate into the cacerts file.
Syntax: -import -v -trustcacerts – alias pickAliasName -file pathToCertificateWithFileName -keystore cacerts – storepass password
There are three things you will need to change:
- Value for -alias.
- Use the host name in the certificate
- Value for -file.
- If the certificate is in the same directory as cacerts then only give the name of the certificate.
- If not, give the full path including the file name.
- Value for -storepass
- The default password for cacerts is changeit.
Hit enter in the command line. A prompt will appear asking to trust this certificate. Enter Yes The certificate will now be in your cacerts and ready to use.
To create the JDBC connection, go to Workbench in the Data Source Explorer section -> select the new connection profile icon.
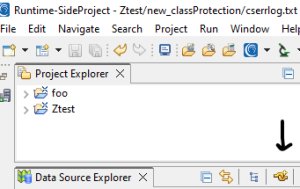
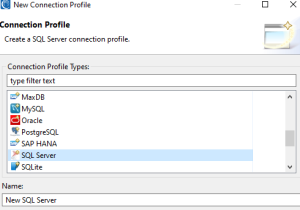
The New Connection Profile wizard will pop up. Select SQL Server and give a Name to the connection -> Select Next.
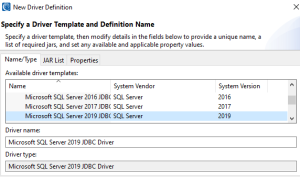
On the next page, select a driver template corresponding to the SQL Server version you are connecting to -> Then click on the JAR List tab.
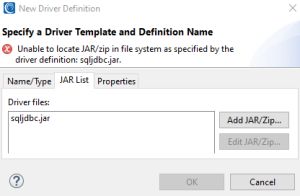
In the JAR list tab, select the driver file sqljdbc.jar. Then click Edit JAR/Zip…
Select the jar file that was downloaded earlier from the SQL Server website. Once the jar file is selected, click Okay, then click Okay again.
A new page will appear that will require the following information:
- Name of the Database
- Host name
- Port number
- User Name
- Password
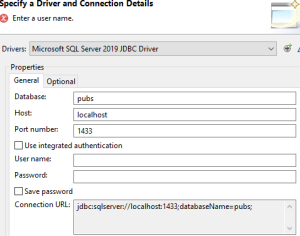
Once all the information is provided, select the Optional tab to add the parameters needed so that the JDBC driver can use SSL.
The following are the needed parameters:
- trustStrore=pathToTrustStore
- trustStorePassword=password
- hostNameInCertificate=hostname
Enter each of the above parameters one by one in Optional properties, then click Add for each. The image below shows the end result.
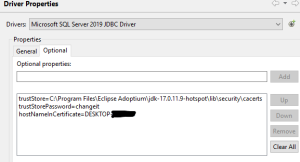
Click on the General tab and select the Test Connection button to validate that the JDBC driver can connect to the database.
Database Connection Registry
One last step is needed for Workbench. This is setting up the database connection registry. Select the IRI icon at the top of Workbench, then select IRI Preferences…
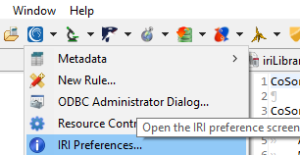
In preferences, click the twisty next to IRI, then on Connection Registry -> Select Database Connections.

Select the bit version associated with the ODBC connection that was created and click on the refresh button to populate the DSN column.
Select the ODBC connection that was created and click on the edit button. A new window will appear which will map the ODBC driver to the JDBC driver that connects to the same database.
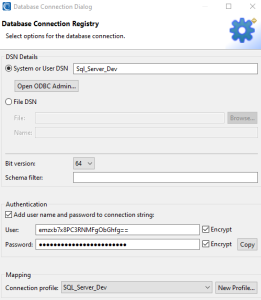
Make sure that the bit version is correct. In the Authentication, section selects the Add username and password to connection string. This will enable the two text boxes below to input the credentials needed. You can also encrypt the credentials to prevent them from appearing in plaintext within Workbench-generated SortCL job scripts.
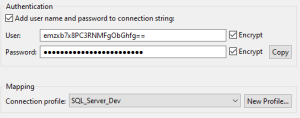
At the very bottom in the Mapping section, click on the Connection profile drop-down box and select the JDBC connection that was just created. Finally, select OK, then Apply and Close to save the changes.
Bypass Using Certificates
A lot of the steps are similar to the Using Certificates section. Only the steps that differ will be explained for the setup for both ODBC and JDBC.
ODBC Setup
Since this option is about bypassing the use of the certificate there is no need to import any certificate to the Trusted Root certification Authorities. A lot of the setup for the driver is the same except for the Connection Encryption Setup.
On the fourth page of the ODBC configuration, set the Connection Encryption to Mandatory and select Trust server certificate. This will tell the Microsoft JDBC Driver for SQL Server to not validate the SQL Server TLS certificate.
**Recommended only for testing or development environments, NOT production.
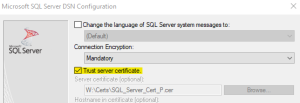
Test the connection to validate that everything is working correctly.
JDBC Setup
For the JDBC setup, you can skip importing the certificate into a keystore. The rest is the same except for the properties added in the Optional tab. The only property needed in the Optional tab is trustServerCertificate=true.
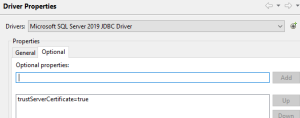
Click on the General tab and click on Test Connections to validate that everything is working.
Disable Encryption on Drivers
Depending on the version of the drivers used to connect to the database, the driver can have encryption enabled by default even if the server does not have SSL setup. This will cause connection errors to occur. The following steps tell how to disable the default encryption for both drivers.
ODBC Setup
Since the database server is not using SSL for the ODBC driver, there is no need to do any of the steps dealing with the certificate. The only different step is when creating the ODBC connection. The Connection Encryption is set to optional.
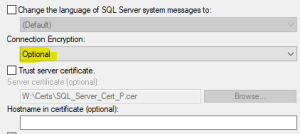
JDBC Setup
For the JDBC driver, since the database server is not using SSL connections there is no need to import a certificate to a trust store. The rest of the steps are the same when compared to the steps in Using Certificates. With JDBC Setup, the only parameter needed is encrypt=false
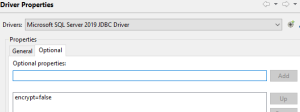
This will tell the driver that the server is not using an SSL connection when connecting to the database.
If you have any questions about this article or need help setting up IRI software in this environment, please email voracity@iri.com.

