How to Run Remote Jobs from IRI Workbench
This article covers the creation and use of remote server connections from IRI Workbench so you can run CoSort (Voracity), NextForm, FieldShield, or RowGen scripts on other computers.1
IRI Workbench is the graphical IDE client, built on Eclipse™, where you design and manage all IRI software jobs. Depending on your license agreement, your program’s executable can run on one or more Windows, Linux, or Unix servers.
We will detail these steps for setting up and running remote jobs:
- Set up the remote environment and connection.
- Create a directory on the remote server to hold your projects (optional).
- Create a remote project.
- Set up the Run Configurations.
- Execute a job script on the remote server.
Set up the remote environment and connection
First, go through this “pre-flight” checklist. Make sure that:
- Your remote server is an SSH server.
- Your back-end IRI software product is installed and licensed on that server.
- You have set its “HOME” environment variable on the server. If you have CoSort or Voracity, that would be $COSORT_HOME on Unix or %COSORT_HOME% on Windows. Typically, this is the install directory for the software.
- The directory location of the executable is in the PATH on the remote server, though that can also be set later in the Workbench Run Configurations dialog. The executable for running CoSort or Voracity jobs installs into COSORT_HOME/bin by default, but it can be moved.
These same prerequisites apply if you are using different IRI product executables. If you use FACT, consult its manual for other configuration details.
To connect the IRI Workbench client and your remote server, you must define a New Connection in the Remote Systems view. If you do not see the Remote Systems view, click Window, Show View, Remote Systems. In the Remote Systems view, click the first icon in its toolbar.
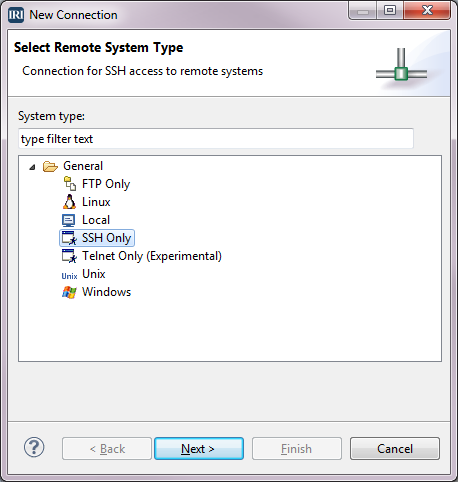
This opens the Select Remote System Type dialog. Click SSH Only. Do not select any of the other types. Now click Next.
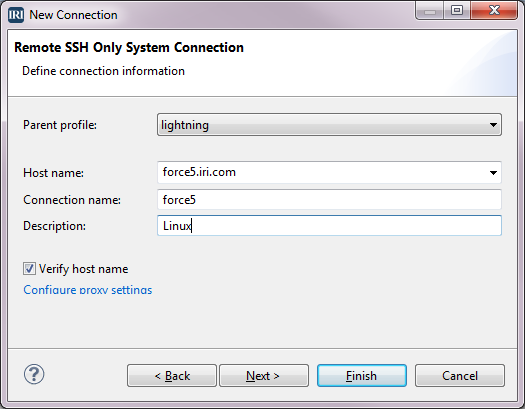
Next is the Remote SSH Only System Connection dialog. The Parent profile should have the name of the client computer where you are running IRI Workbench (lightning in this case).
The Hostname is the name of the remote server. Here, the remote server is force5.iri.com and the Connection name can be force5.
The Description field gives further information about the server. Linux is entered here to indicate the operating system on force5. Now click Finish.
The connection name is added to the tree in the Remote Systems view.
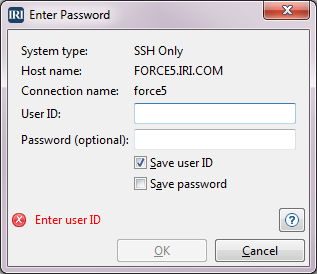
Now you can finish setting up the connection. Right-click on the connection name in the tree and select Connect. This dialog opens:
Normally, I type in the User ID and Password, then select both Save user ID and Save Password, and click OK. If you get a popup about the authenticity of the host, click Yes to continue connecting.
Expand the Sftp Files tree under force5, then expand My Home. This will show the home directory for the login we just set up for the remote system.
Create a master directory on the remote server (optional)
If you intend to build multiple projects on the remote server, it is recommended you create a directory that will hold multiple project directories below it. To do that:
- Highlight My Home under the Sftp Files connection that was just created.
- Right click and select New -> Folder.
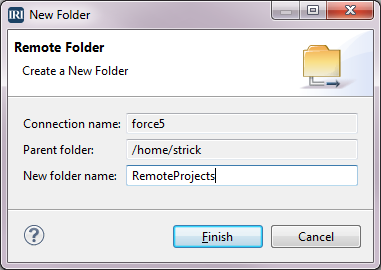
- In the New Folder dialog, Connection Name and Parent folder will already be filled in.
- For the field New folder name, type in the directory name RemoteProjects.
- Click Finish. The new folder is created on the remote server and should appear in the tree under My Home in Workbench.
You can then create one or more project folders in this directory on the remote server. Ideally, all project directories should be created under the RemoteProjects directory, but they can be created anywhere.
Add products details to preferences
If using a remote executable, the product details need to be set up in preferences.
- On the toolbar, click IRI Menu -> IRI Preferences -> IRI -> Products.
- Click Add.
- In Name, enter a unique name for this product, CS_Force5.
- Select CoSort as the product.
- Change the file system to RSE.
- Browse for the location of the product home on the remote server.
- Click OK. This will add this product to the registry used by this copy of Workbench. The product can now be used by any remote project on the same host. Multiple products can be added to the registry. The list should be put in order of preference. The default executable for running a job will be the first executable associated with the project host.
Create a remote directory and project
To create a specific remote directory and project (under our master RemoteProjects directory):
- Highlight RemoteProjects in the Remote Systems tree under force5.
- Right-click and Select New -> Folder.
- In New folder name, type in the name remote_project1.
- Click Finish. The new folder is created on the remote server and appears in the tree under My Home/RemoteProjects.
- Right-click on the newly created directory remote_project1 -> Create Remote Project.
We now have the project directory on the remote server called remote_project1, and a project has been created in the IRI Workbench Project Explorer called force5_remote_project1.
Note that if you are unable to access the files in a project, that project might be closed. To open a project, double-click on it, or right-click on the project, and select Open Project.
Create a job
Create a job in the new project by using any of the wizards in the toolbar.
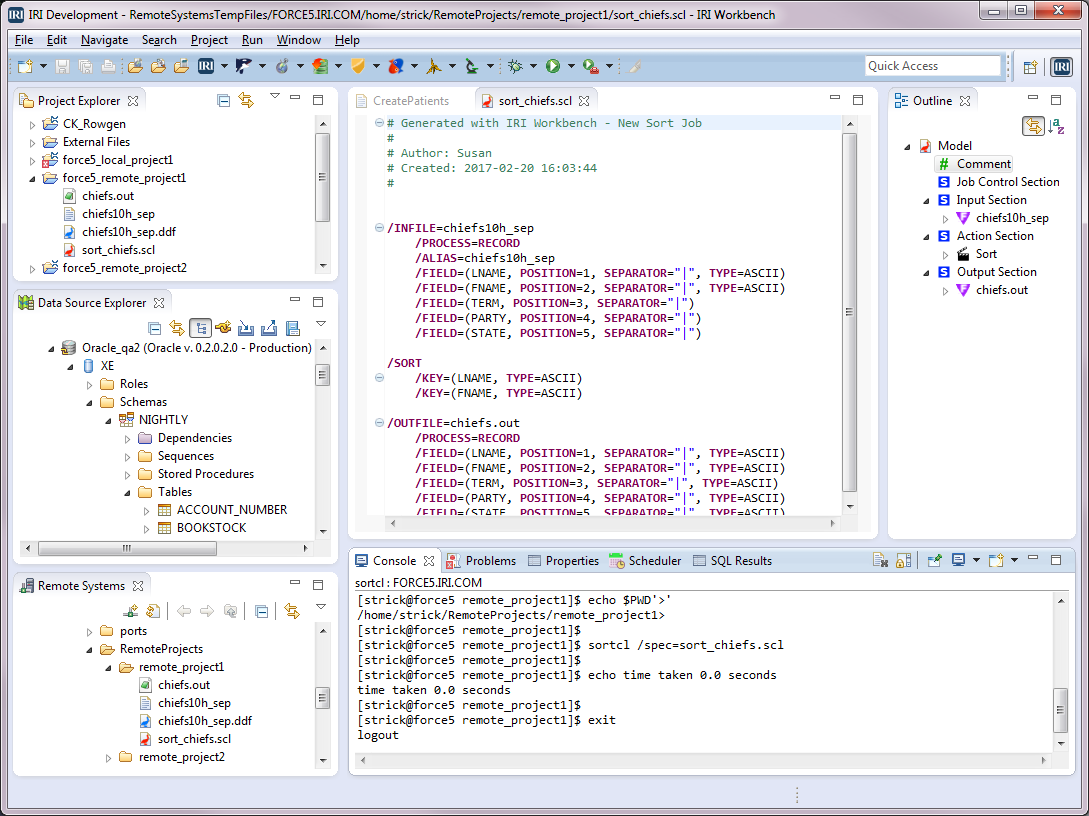
Execute a job script on the remote server
- Navigate to the remote project force5_remote_project1 in the Project Explorer.
- Right-click on the name of a script in the project or inside the body of an open job script from that folder.
- Select Run As -> IRI Job.
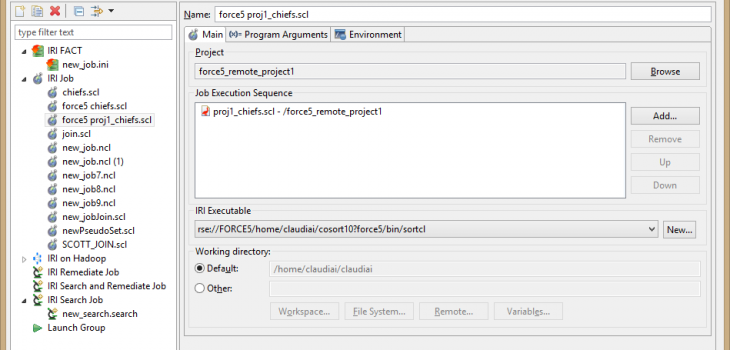
- The first executable in the product registry that is on the same host as the script will be used to run the job. If that is not the desired executable, a different executable can be selected by clicking Run As -> Run Configurations and filling out the fields as below with a different executable. The working directory defaults to the directory associated with the project. This too can be changed.
Any output targets from jobs without an explicit path specified will go into in the remote project when the job is done. The Console view for force5 will show the job running and the time it took to complete.
You can re-run this script again at any time using the saved configuration force5 proj1_chiefs.
- Click on the drop-down arrow next to the green circled arrow on the navigation bar.
- Select Run Configurations.
- Select force5 proj1_chiefs under IRI Job in the panel to the left.
- Click Run.
When you perform step 1, it is possible that the name for the job configuration will be in the drop-down list. If that is the case, then you can click on it there to run the job.
We have now demonstrated how to set up a remote project for executing remote job scripts in IRI Workbench, and how Run Configurations can be saved so you can re-run those jobs. If you need help, contact support@iri.com.

