Feeding Datadog with Voracity Part 2: Data Preparation &…
This article is the second in a 4-part series on feeding the Datadog cloud analytic platform with different kinds of data from IRI Voracity operations. It focuses on preparing data in Voracity, and getting Datadog ready to receive it. Other articles in the series cover: the need for Voracity ahead of Datadog; displaying Voracity-wrangled data in Datadog; and, using IRI DarkShield search logs in security analytics.
My previous article provided an overview of Datadog and how IRI Voracity can accelerate Datadog visualizations through external data preparation (data wrangling), masking, cleansing, synthesis, etc. This article focuses on how you can prepare raw data for analytics in Voracity and send it seamlessly into Datadog, and the next article will document what to do with that data once it’s in Datadog.
Wrangling large data, particularly structured file inputs, has always been a core IRI strength. In this case, I am using the CoSort SortCL program in the Voracity platform to perform a basic sort and filter operation of a very large CSV file containing UK company data (see the first article).
My Voracity Data Wrangling Job
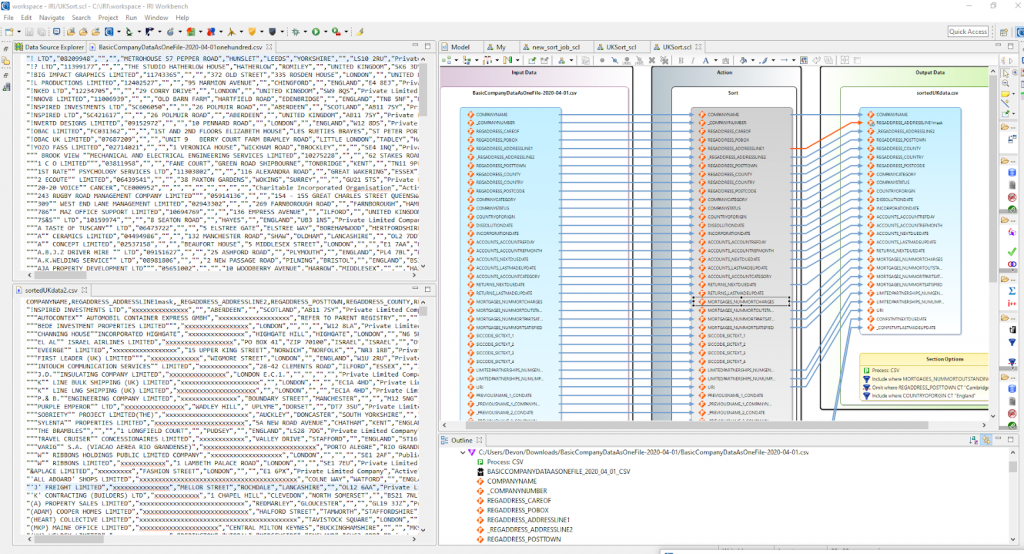
Below is a view of the raw UK company input data, the SortCL-powered data wrangling jobs shown in its “transform mapping diagram” form, and the Voracity output results for Datadog. They are managed in IRI Workbench, the free graphical IDE for Voracity, built on Eclipse™:
The actual SortCL script that runs the job shown (and can also be edited) in IRI Workbench is:
# Generated Automatically with IRI Workbench - New CoSort SortCL Job
 # Author: Devon K
 # Created: 2020-04-03 14:41:45

/INFILES=C:/Users/Devon/Downloads/UKCompanyData/BasicCompanyDataAsOneFile-2020-04-01.csv
    /PROCESS=CSV
    /ALIAS=BASICCOMPANYDATAASONEFILE_2020_04_01_CSV
    /FIELD=(COMPANYNAME, TYPE=ASCII, POSITION=1, SEPARATOR=",", FRAME="\"")
    /FIELD=(_COMPANYNUMBER, TYPE=ASCII, POSITION=2, SEPARATOR=",", FRAME="\"")
    /FIELD=(REGADDRESS_CAREOF, TYPE=ASCII, POSITION=3, SEPARATOR=",", FRAME="\"")
    # /FIELD statements #4-54 redacted for brevity - contact me if you’d like them
    /FIELD=(_CONFSTMTLASTMADEUPDATE, TYPE=ASCII, POSITION=55, SEPARATOR=",", FRAME="\"")

/SORT
    /KEY=(COMPANYNAME)

/OUTFILE=C:/Users/Devon/Downloads/UKCompanyData/sortedUKdata.csv
    /PROCESS=CSV
    /FIELD=(COMPANYNAME, TYPE=ASCII, POSITION=1, SEPARATOR=",", FRAME="\"")
    /FIELD=(REGADDRESS_ADDRESSLINE1mask=replace_chars(REGADDRESS_ADDRESSLINE1,"x"), TYPE=ASCII, POSITION=2, SEPARATOR=",", FRAME="\"")
    /FIELD=(_REGADDRESS_ADDRESSLINE2, TYPE=ASCII, POSITION=3, SEPARATOR=",", FRAME="\"")
    /FIELD=(REGADDRESS_POSTTOWN, TYPE=ASCII, POSITION=4, SEPARATOR=",", FRAME="\"")
    /FIELD=(REGADDRESS_COUNTY, TYPE=ASCII, POSITION=5, SEPARATOR=",", FRAME="\"")
    /FIELD=(REGADDRESS_COUNTRY, TYPE=ASCII, POSITION=6, SEPARATOR=",", FRAME="\"")
    /FIELD=(REGADDRESS_POSTCODE, TYPE=ASCII, POSITION=7, SEPARATOR=",", FRAME="\"")
    /FIELD=(COMPANYCATEGORY, TYPE=ASCII, POSITION=8, SEPARATOR=",", FRAME="\"")
    /FIELD=(COMPANYSTATUS, TYPE=ASCII, POSITION=9, SEPARATOR=",", FRAME="\"")
    /FIELD=(COUNTRYOFORIGIN, TYPE=ASCII, POSITION=10, SEPARATOR=",", FRAME="\"")
    /FIELD=(DISSOLUTIONDATE, TYPE=ASCII, POSITION=11, SEPARATOR=",", FRAME="\"")
    /FIELD=(INCORPORATIONDATE, TYPE=ASCII, POSITION=12, SEPARATOR=",", FRAME="\"")
    /FIELD=(ACCOUNTS_ACCOUNTREFDAY, TYPE=ASCII, POSITION=13, SEPARATOR=",", FRAME="\"")
    /FIELD=(ACCOUNTS_ACCOUNTREFMONTH, TYPE=ASCII, POSITION=14, SEPARATOR=",", FRAME="\"")
    /FIELD=(ACCOUNTS_NEXTDUEDATE, TYPE=ASCII, POSITION=15, SEPARATOR=",", FRAME="\"")
    /FIELD=(ACCOUNTS_LASTMADEUPDATE, TYPE=ASCII, POSITION=16, SEPARATOR=",", FRAME="\"")
    /FIELD=(RETURNS_NEXTDUEDATE, TYPE=ASCII, POSITION=17, SEPARATOR=",", FRAME="\"")
    /FIELD=(MORTGAGES_NUMMORTCHARGES, TYPE=ASCII, POSITION=18, SEPARATOR=",", FRAME="\"")
    /FIELD=(MORTGAGES_NUMMORTOUTSTANDING, TYPE=ASCII, POSITION=19, SEPARATOR=",", FRAME="\"")
    /FIELD=(MORTGAGES_NUMMORTPARTSATISFIED, TYPE=ASCII, POSITION=20, SEPARATOR=",", FRAME="\"")
    /FIELD=(MORTGAGES_NUMMORTSATISFIED, TYPE=ASCII, POSITION=21, SEPARATOR=",", FRAME="\"")
    /FIELD=(LIMITEDPARTNERSHIPS_NUMGENPARTNERS, TYPE=ASCII, POSITION=22, SEPARATOR=",", FRAME="\"")
    /FIELD=(LIMITEDPARTNERSHIPS_NUMLIMPARTNERS, TYPE=ASCII, POSITION=23, SEPARATOR=",", FRAME="\"")
    /FIELD=(URI, TYPE=ASCII, POSITION=24, SEPARATOR=",", FRAME="\"")
    /FIELD=(CONFSTMTNEXTDUEDATE, TYPE=ASCII, POSITION=25, SEPARATOR=",", FRAME="\"")
    /FIELD=(_CONFSTMTLASTMADEUPDATE, TYPE=ASCII, POSITION=26, SEPARATOR=",", FRAME="\"")
/INCLUDE WHERE MORTGAGES_NUMMORTOUTSTANDING GT 1
/OMIT WHERE REGADDRESS_POSTTOWN CT "Cambridge"
/INCLUDE WHERE COUNTRYOFORIGIN CT "England"
Note that this job script was automatically generated by an IRI Workbench wizard. Workbench provides a syntax- aware editor for those who prefer to manually interact with the metadata, as well as mapping diagrams and outlines shown above, or graphical dialogs and form editors. Changes made in any one mode reflect in the others (“different strokes for different folks”).
Now that I have a rapidly-made, BI-ready target file (or “log” in Datadog parlance), I can feed it to Datadog in real-time!
The Datadog Feeder Agent
To get started, a Datadog agent should be installed and running on the same machine(s) where the IRI output or log data will go. Datadog, like Voracity, supports AIX, Linux, macOS, and Windows. You thus need access to the IRI data target machine(s) to configure the agent.
The Datadog agent can be installed on multiple computers and still send logs to the same web interface, which is accessed just by logging into your Datadog account. Go to the Datadog base directory (varies by O/S) on the agent machine, and see the configuration advice here.
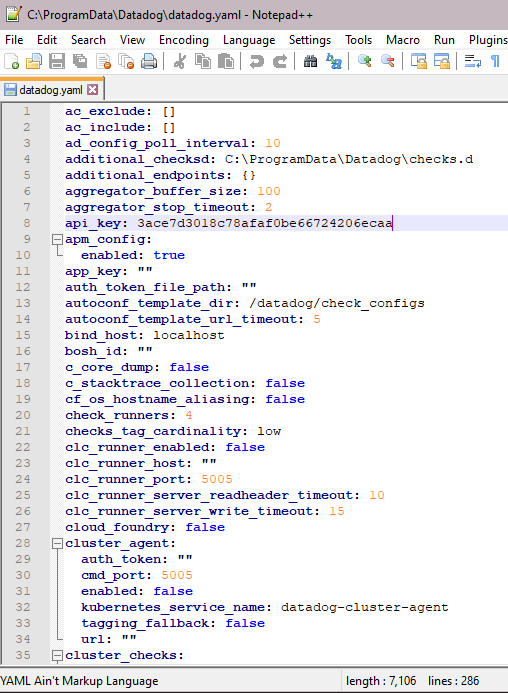
The main configuration file (datadog.yaml) must be specified to have logs enabled: (“logs_enabled: true”). This is one of the settings in the datadog.yaml file, which lists many settings regarding the configuration of the Datadog agent.
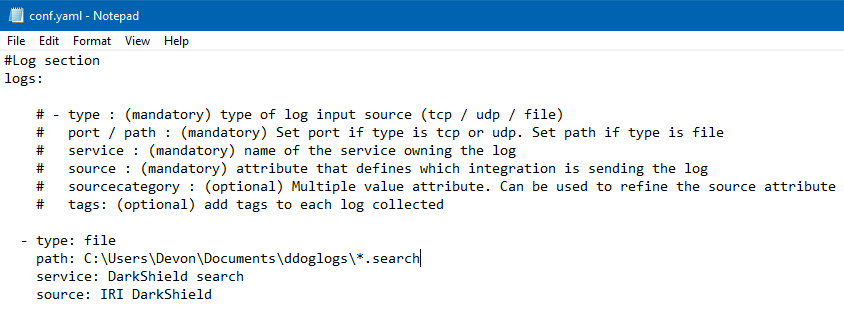
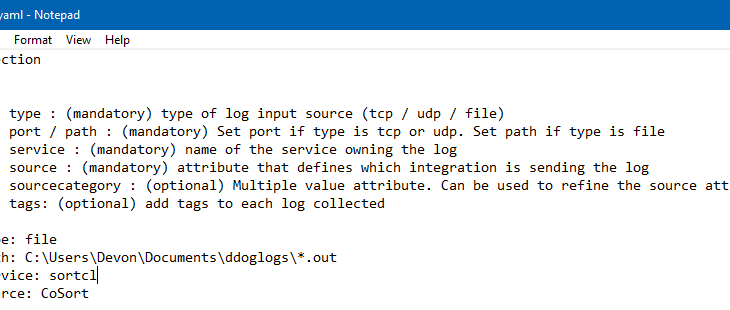
Next, create a directory within the conf.d folder called CoSort.d. This can be called anything, as long as it ends with “.d”. Create a conf.yaml file in this directory, and format it like this:
Everything following a “#” is a comment. The example above includes several that describe the structure of a typical conf.yaml used to specify locations to collect logs.
Asterisks can be used to specify all of a certain file type, directory, or files or directories that start with certain letters. Tags can also be added to provide more detail when searching the logs later.
If the type of log input source in this configuration file is tcp, then the logs will be sent in real-time. If the type of input is specified as a file, then logs will be sent in “batches” via https every 1-10 seconds, depending on a setting that can be specified in the datadog.yaml file.
I also set up a similar conf.yaml file in a DarkShield.d directory within the conf.d directory for work I will demonstrate in Article #4 of this series. This yaml file will log all DarkShield .search files in a specified directory:
Enable Agent Permission
The Datadog agent needs system permission to collect the data in the Voracity target directories. On Windows, right click on the lowest level folder needed to be granted permission to, and select “add” to add a user. On Linux, you may have to chmod the directory.
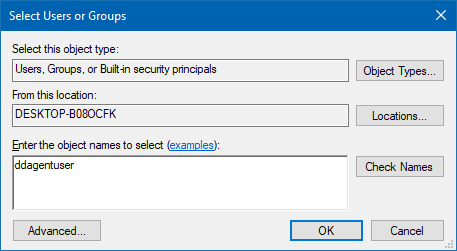
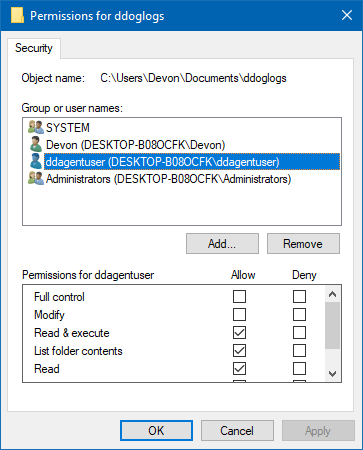
A user called ddagentuser should have been created on installation of the Datadog agent. Type this into the “Enter the object names to select” text box, as shown in the image below:
Click “OK” to add the user, then make sure both read and write permissions exist for the ddagentuser. Modify permissions need not be granted. Permissions should now look like this:
Multiple Configurations for Multiple Feeds
You can set up as many configurations as needed to allow all the data you want to be logged.
For example, if you want all .csv files in a certain CoSort target file directory, follow the pattern: path/to/directory/*.csv . If you want all DarkShield .search files in a directory already in your path to be logged, just specify *.search with no prior directory.
Only new files will be logged; existing files will not. So, set up your Datadog logging configurations before running any IRI jobs in order to not miss any existing or future logs.
Restart the Agent to Register Your Changes
After you modify the Datadog agent configuration above, you need to restart the agent for those changes to be registered within, and get the feeds from Voracity going into Datadog. To restart:
- Navigate to the directory that contains the Datadog executable in an administrative PowerShell, or terminal on Linux. On Windows, look in C:\Program Files\Datadog\Datadog Agent\bin.
- Run the command ./agent restart-service to restart the Datadog agent.
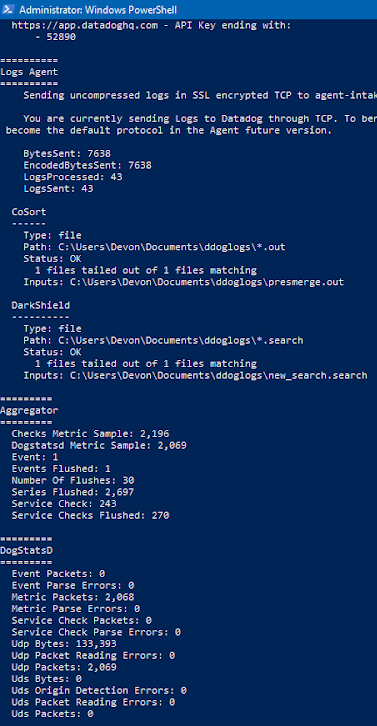
- Run the command .agent /status to confirm the agent will send IRI data to Datadog
From the status display shown below, you can see that I specified a CoSort log source for all .out files in a certain directory, and that an output file from SortCL was logged into Datadog. By default, the Datadog agent will send the content of the files (as “logs”) to the Datadog server via TCP. Logs can also be sent via HTTPS.
HTTPS is more reliable than TCP and is the setting Datadog recommends. However, TCP logs in real-time, while HTTPS gathers logs in “batches” every 1-10 seconds. The HTTPS gather time can be modified in another setting in the Datadog.yaml file in the main Datadog directory.
HTTPS will become the default setting in future releases of Datadog. HTTPS can be set by going to the logs_config setting in Datadog.yaml and setting the following two sub-settings to true: use_http, and use_port_443.
I also specified a DarkShield source that will log all .search files in a specified directory produced by the DarkShield Dark Data Search/Masking Job wizard in IRI Workbench:
Setting Up the Datadog Processing Pipeline
Before we actually feed Datadog, we have another step to consider and configure — to create pipelines and parsing rules to extract attributes from the logs, and turn them into ‘facets’ that can be used as values in visualizations.
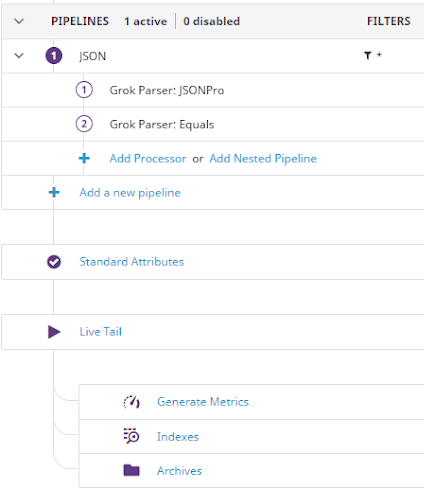
To make the best use of visualizations and analytics, attributes will need to be parsed from the logs in Datadog. However, to create a custom parser to extract these attributes, a pipeline must first be created.
You can create a pipeline under the Logs > Configuration section of the Datadog web interface, accessed simply by logging into your Datadog account. A pipeline allows you to filter logs based on facets and queries. Once a pipeline has been created, parsing rules can be generated for all the logs that will fall within the scope of that pipeline by using a processor.
Note that custom parsing rules are only necessary for logs of a format that is not XML or JSON. If custom parsing rules are necessary for your logs, this step should be taken before sending any logs to Datadog. This is so that Datadog will be able to extract attributes from your logs from the start. Otherwise, attributes will only be able to be extracted from newly incoming logs, not any existing logs.
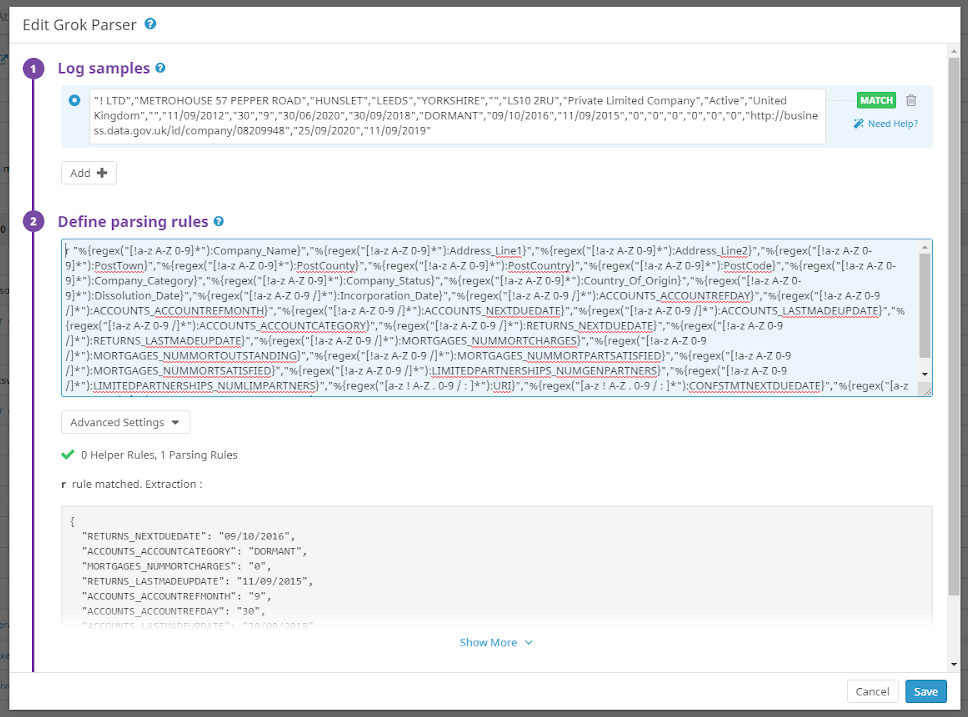
Datadog has several processors; I will be using the Grok Parser. To use the Grok Parser, click on Add Processor underneath the pipeline you want to have log attributes parsed from. Enter a sample of the type of log you want to process. Then, enter parsing rules to extract attributes from your data.
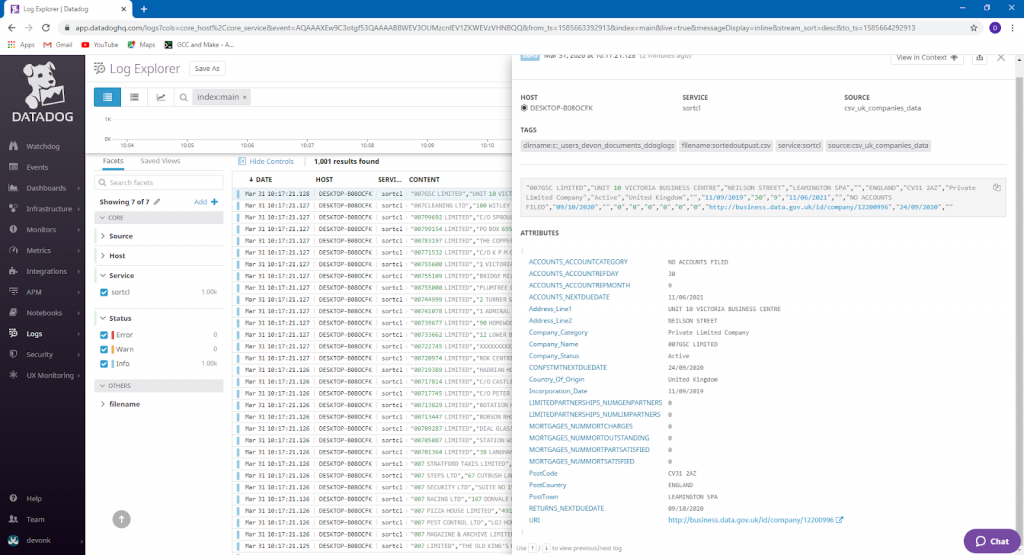
If you entered a log sample, Datadog will automatically show you how your log will be parsed based on your parsing rules as you type them. Datadog parsing rules are quite powerful and diverse. Ultimately, the attributes are extracted in JSON format:
If attributes are being properly extracted from the logs, all the attributes should be visible by clicking on one of the log entries.
Datadog can only extract attributes from logs sent if these pipeline and processing rules exist first, unless the logs are in XML or JSON format.
Log File Attributes (Facets)
A facet provides additional information about logs that can be used to filter, search, and create visualizations. Facets can be generated from attributes associated with logs in Log Explorer.
Attributes are specific slices of data within a log, such as a single field in a record. A facet for a filename, for example, can be set up prior to logs being sent by clicking Add Facet and choosing a predetermined suggestion for a filename facet that appears.
To generate a facet from attributes, simply click on the log, then click on the attribute you want to generate a facet with. A menu will appear with the option to add a facet:
While attributes are necessary to generate facets based on the data within the file and not the properties of the file, just having attributes extracted from logs will not allow you to create visualizations. The attribute must be also added as a facet to allow that functionality.
Choosing the filename facet will keep track of the filename that the data from the log came from. With this facet selected, it is easier to narrow search results to a specific file or files. You can also specify the specific time that the file was sent to Datadog to narrow down query results, but setting up a facet for filename is generally more effective and simple.
Next Steps
At this point, everything should be set up for Voracity log collection in Datadog to occur. Once in Datadog, it will be easy to turn this wrangled data into useful analytic query results and visualizations. In the next article of this series, I will demonstrate collection and visualization, and discuss Datadog’s ability to send alerts based on certain specified values or thresholds.
